8 Tips to Create a Top-Notch Email Infrastructure

Email infrastructure is the backbone of your email program. Without the proper foundation set up, it would be increasingly more difficult for your email campaign to reach your recipient’s inbox.
When your prospective leads receive an email, they see a great attention-grabbing letter, but there had to be an even greater email infrastructure working tirelessly behind the scenes to deliver that great message.
Just like when you watch the news, you only see the host presenting skillfully well-structured information. However, you know that behind the scenes, a whole team of professionals spent hours preparing that story.
In this post, we will cover:
What is Email Infrastructure?
Email infrastructure is the technical part of your email marketing program. Setting up a proper email infrastructure helps ensure that your messages reach your email client.
Email infrastructure refers to the domains, mail agents, feedback loops, and IP addresses of the servers you’re sending emails from. These elements contribute to how all the wheels function inside your email marketing machine. Mailbox providers analyze a number of these factors when deciding where your email will land.
Prioritizing your email infrastructure is one of the best email marketing practices that can help you achieve high email delivery rates. In order to maintain a high IP and domain reputation, sign up for feedback loops and implement email authentication.
Below are some tips you can use to start off or improve your email infrastructure.
Top 8 Email Infrastructure Tips
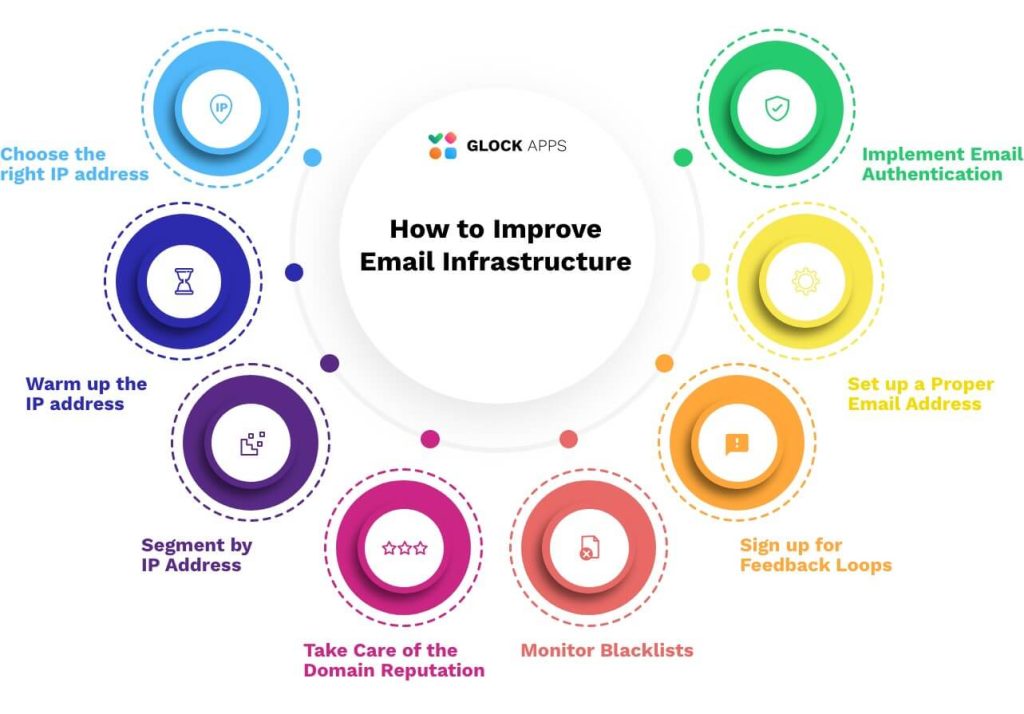
#1 Choose a Type of IP Address
There are two types of IP addresses: shared and dedicated.
A shared IP address is used by several senders. It is like a co-working space that different companies use. Nowadays, shared IP addresses are pretty common, so let’s look at the pro’s and con’s that you should consider:
- Price: Shared IPs are inexpensive because the hosting provider divides the hosting fee between all the IP’s users.
- Sending Volume & Frequency: With a shared IP, you don’t have to worry about how many emails you send on a regular basis. A mail transfer agent, or mail server, judges the IP reputation score based on everyone’s sending practices in that IP pool.
- Reputation: Unfortunately, this feature can also cause you to land in the spam folder. Since you don’t have control over the shared server’s reputation score, you could be affected by someone else’s malicious behavior on that same server. Even if it’s just a few domains, if they’re sending a high volume of spam, it’ll affect your email delivery. Similarly, you can keep your office nice and clean in your co-working space, but you can’t control the actions and behaviors of other companies sharing the space.
A dedicated IP address only belongs to you. Now you’ve upgraded from a co-working space to a whole office space suitable for big corporations like Apple or Google. Although it has some obvious advantages compared with shared IP, there are downsides as well. Let’s look at both:
- Price: If the IP only belongs to you – its cost will be higher. First, you’ll pay for acquiring and setting up such an address. Then, you’ll have to pay your hosting provider for its maintenance.
- Sending Volume & Frequency: Since you’ll be the only one utilizing the IP, the number of emails you send matters. Sending a low volume of emails will hurt your reputation, so every business owner should first contemplate whether or not their company is big enough to send a vast amount of monthly emails. To achieve the best results from a dedicated IP, a business owner needs to send at least 100K emails per month with positive email metrics.
- Reputation: Having a private IP gives you complete control over your sending reputation. Nobody can affect your IP reputation with malicious sending practices. Therefore, any reputation management efforts you make have the most impact on your email deliverability.
- Management: Being the sole user of an IP allows you to manage deliverability issues more easily. When your inbox placement rate decreases, you are able to quickly discover and fix the root cause of the issues. You can also use services like an Uptime Monitor to alert you when your IP has been blacklisted.
What to Choose: Shared or Dedicated IP Address?
The biggest factor in making this decision is your company size. If you are a high-volume sender (sending more than 500,000 messages per month) and want to have complete control over your sender’s IP reputation, then you need to choose a dedicated IP address or even multiple dedicated IP addresses.
If you send less than 50,000 messages per month or you have not developed your sending reputation yet, you should use shared IP addresses. However, keep in mind that other users sharing the same IP can impact the overall IP reputation and your email delivery rates.
Many low-volume senders ask their email service provider to switch them to a dedicated IP address for control over their IP reputation.
#2 Warm up your IP Address
You have to warm up your new IP the same way you warm up and stretch before going to the gym to avoid injury. Skipping this step could result in your IP getting blacklisted.
If you get a new dedicated IP address and send a million emails from it right away, you’re going to run into a lot of issues (spam folder placements, IP blacklisting, bad reputation, etc.) After an IP’s reputation has been tarnished, it is extremely difficult to recover it.
Thus, when you get a new dedicated IP address, you need to take your time and warm it up. The warm-up process involves sending small volumes of emails and slowly increasing the amount until you reach your desired quantity per day.
The warm-up process helps show that you are a consistent sender and builds a reputation for your IP. We recommend that you send emails to your most active recipients during the warm-up process. Positive user engagement will add more points to your IP reputation score.
If you are new to the IP warm-up, you can leverage email reputation management tools that can do it for you.
Also, make sure that you have your bounce handling process in place. Monitor your bounced emails and user complaints. If either of your bounce rate or complaint rate goes up, stop sending, re-check your email list for validity and revise your email program to continue sending relevant emails.
How to Warm up Your IP Address
Learn how to properly warm up your email marketing program’s new IP with this 11-page whitepaper.
#3 Segment Email Streams by IP Address
To maximize their email marketing efficiency, high-volume senders should get a few dedicated IP addresses and segment their mail streams by the IP. For example, they should send transactional emails and marketing emails from different IP addresses. These types of messages typically have different engagement and different IP reputations.
The IP reputation for marketing emails, which is typically lower, will not affect the deliverability of transactional emails.
Companies with multiple brands should also use different dedicated IPs for each brand. Additionally, they should segment their marketing and transactional emails under each brand by different IPs to provide more detailed reputation reporting.
Also, consider using a different IP address to send a re-engagement email campaign because they usually have the worst deliverability and highest user complaint rates.
A marketing manager that’s in charge of sending re-engagement campaigns, should consider splitting their list. To protect their reputation, they should send just a few hundred emails at a time (or per hour) from a different IP instead of their primary IP.
#4 Protect your Domain Reputation
Aside from your IP reputation your sender domain also has a reputation.
What is a Domain Reputation?
Domain reputation is a score assigned to your domain. It’s equally as important as the reputation of your IP address.
Your domain reputation can’t be established overnight. It’ll take some time to prove that you are a consistently responsible campaign sender.
Therefore, if your domain sends emails that receive negative engagement, your IP address’ reputation won’t matter. ESPs may still filter your email marketing campaigns as spam.
Linking unreputable domains in your email body can also land you in the spam folder. Make sure that you’re linking only to trusted sites and, ideally, only those that you control.
How to Check Domain Reputation
Unfortunately, most mailbox providers don’t allow the senders to check their domain reputation. It is assessed internally and is not disclosed.
Google, however, provides such email data to assist with reputation management in its postmaster tools. If you have a high spam-placement rate with Google, start the investigation process by analyzing your sender domain and IP in Google Postmaster.
How to Improve Domain Reputation
The golden rule to improving your domain reputation is to follow the best email marketing practices. Be sure to:
- Keep your engagement rate as high as possible
- Keep your emailing list clean by deleting inactive recipients
- Use segmentation
- Send relevant content to keep unsubscribe rates low
To improve your email deliverability and domain reputation, reach out to our Email Deliverability consultants or request deliverability services.
#5 Monitor Blacklists
There are dozens of blacklists out there. Most blacklists will list your IP address or sending domain if they see a high number of spam complaints, spam trap hits, or both.
Your deliverability won’t suffer simply because your IP or domain is on a blacklist. Most mailbox providers refer to Spamhaus, a major blacklist, to determine whether they should filter emails from a sender.
Find out if You’re Blacklisted
You can also use a spam testing tool to check each of your sender IPs and your domains (including the domains in the email body and redirects) against 50+ blacklists and review your listings.
To find out whether blacklists are affecting your deliverability, look at your bounced email messages. If a message was blocked because of a blacklist, the bounce error description will show any of the following messages:
5.7.1 554 5.7.1 Service unavailable; Client host [xx.xxx.x.xx] blocked using
dnsbl.sorbs.net; Currently Sending Spam
See: http://www.sorbs.net/lookup.shtml?xx.xxx.x.xx
5.7.1 554 5.7.1 Service unavailable; Client host [xx.xxx.x.x] blocked using
multi.uribl.com; 127.0.0.1 -> Query Refused. See http://uribl.com/refused.shtml
5.7.1 554 5.7.1 Service unavailable; Client host [xx.xxx.x.xx] blocked using
zen.libranosdelspam.com; SORBS - Currently Sending Spam
If you use a dedicated IP, we recommend starting the delisting process right away.
If you are on shared IP, your email service provider (who controls the IP) should take care of it.
Also Read: IP Blacklist Check and Removal: The Ultimate Guide to Blacklists
#6 Sign up for Feedback Loops
A feedback loop allows a marketing team to be aware of negative engagement from their email campaign. Most major mailbox providers offer feedback loop service (FBL) as part of their analytics tools. After you sign up with FBL, the mailbox providers will let you know when an email client reports your messages as spam. If you get marked as spam, you must immediately remove the spam reporter’s email address from your mailing lists.
If you continue sending emails to recipients who have previously marked your messages as spam, it can be extremely harmful to your sender reputation.
Email service providers automatically handle spam complaints and suppress the spam reporter’s email address from receiving further email communication.
If you send using your own SMTP server, then we highly recommend that you sign up for feedback loops to have better control over your mailing lists, reputation, and deliverability.
#7 Set up a Proper Email Address
Your “From” email address and “Reply-To” email address must be valid mailboxes that are able to receive emails. This allows a recipient to reply without a message failure.
You’ll want to set up a domain and use the “From” and “Reply-To” email addresses on @yourdomain. Sending marketing emails from a free domain such as @gmail.com or @hotmail.com won’t help your brand recognition in your recipient’s inbox and doesn’t entice them to open your message.
A branded “From” name and email address helps your recipients recognize your emails faster, increases the likelihood of an open, and helps build a better sender reputation.
Read more about email branding and its role in deliverability.
Your sending domain must have a valid email exchange (MX) record. If it doesn’t, some mailbox providers can block your message.
If your marketing team sends emails via your SMTP server, it is highly recommended that you create a special mailbox to receive bounce emails, for example, bounce@yourdomain.com.
Some mailbox providers will send bounce email notifications to your “From” address. So, you should be monitoring both “From” and “Return” email addresses for bounce messages in order to suppress hard bounce addresses from your mailing lists.
Many mailbox providers require that you have an abuse@yourdomain.com and a postmaster@yourdomain.com email address set up to receive their feedback loops. Mailbox providers that don’t provide the FBL service also send user complaints to these email addresses. So, not only should you set up the abuse@ and postmaster@ email addresses, but you should also monitor them and address any reports of unsolicited emails affecting your email deliverability.
Abuse@, postmaster@, feedback@, hostmaster@, and a few others are considered role accounts. We recommend that you don’t send anything other than abuse reports to such email accounts. You should remove role emails from your active mailing lists to ensure compliance.
Read more: 9 Essential Email List Management Best Practices to Follow in 2023
#8 Implement Email Authentication
Email authentication is one of the key processes for setting up a typical email infrastructure. It proves to an anti-spam filter that an email is not fraudulent and was sent by you. It also helps stop malicious content on its way to your recipients and significantly improves your chances of getting into your recipient’s inbox.
How to Authenticate Emails
There are three commonly used email authentication protocols. Ideally, you should implement all of them to show mailbox providers that the message really comes from you and that it wasn’t altered on its way to its target inbox. Messages that pass authentication checks have a higher likelihood of being delivered and messages that fail DMARC, SPF, or DKIM have a higher probability of going to spam.
- SPF stands for Sender Policy Framework. It is a domain name system (DNS) record that specifies what IP addresses are allowed to send emails from your domain.
- DKIM stands for DomainKeys Identified Mail. A DKIM signature ensures that the mailbox provider receives an identical message to the one you sent.
DKIM protects your message against a malicious alteration in transit. A valid DKIM record is very important for your reputation and deliverability. Implementing DKIM means that business owner takes responsibility for the content they send and the recipient to whom they send it. Email messages without a valid DKIM signature are very unlikely to land in the inbox. - DMARC stands for Domain-based Message Authentication, Reporting & Conformance. It tells mailbox providers what you want them to do with an email that didn’t pass the SPF and DKIM checks: allow it, filter it to spam, or reject it. You can use a DMARC Analyzer to quickly test whether or not your domain is protected with DMARC.
Implementing these email authentication methods for your email program is an important step to building trust between you and mailbox providers.
Read more: Email Authentication: the Ultimate Guide
Test your SPF, DKIM, DMARC Records
Email Authentication Checker
Bottom Line
Mailbox providers judge your email infrastructure as a means to protect their users from unsolicited email traffic. They utilize your email infrastructure to decide whether to:
- Deliver your message
- Filter your email as spam
- Or block it completely
Maximize the effectiveness of your email marketing program by ensuring that your email infrastructure is properly set up.
There are many other factors that tie into your email deliverability aside from your email infrastructure, but a proper email infrastructure helps you protect your brand and contributes to a positive sender’s reputation score.
Take care of your IP reputation and domain reputation by signing up for feedback loops and implementing security protocols to ensure your reputation score and inbox rate remain high.
Test Your Email Infrastructure

Test your Email Placement
See where your emails land: Inbox, Promotions, or Spam.
Improve your Deliverability
Get actionable tips to improve your email’s delivery rate.
Increase your Revenue
Ensure your emails reach your customers.
Related Posts

SendGrid is a powerful email delivery platform used by businesses for transactional emails, marketing campaigns, product notifications, newsletters, and automated Read more

Unsubscribing should be simple. When people no longer want to receive marketing emails, newsletters, or promotional campaigns, they should be Read more
Delayed email delivery can happen for many reasons. Sometimes the delay is caused by the sender’s mail server. Sometimes it Read more
Phishing, email spoofing, business email compromise (BEC), and impersonation attacks have become increasingly common. Modern fake emails often look nearly Read more