How to Track Amazon SES Bounces with GlockApps
Important! The GlockApps Bounce Monitor tool is discontinued.
Amazon SES is a highly popular email delivery service that people use for sending a large volume of emails at a reasonably low cost.
Email systems like EasyMail7 use the API integration with Amazon SES to make it easy for email marketers to send email newsletters without a tech background.
Yes, Amazon SES is very cost effective when it comes to sending a large number of emails, but it also quite scrupulous regarding their reputation. Thus, Amazon SES watches each user’s complaint rate and bounce rate and take measures to stop spammers.
For that reason, it is essential that you understand the term “bounce emails” and how it can impact the sender reputation.
Why Process Bounce Emails
Bounce emails can happen any time, even if you have a confirmed and verified list and highly engaged subscribers. Soft bounces occur due to temporary server issues. Hard bounces come when a recipient’s email address is out of function or their mailbox is full.
A high number of bounces indicates to ISPs that the sender is using bad list acquisition and management practices. Being considered a spammer negatively influences the sender reputation. And mailbox providers know that the emails from that sender should be blocked or sent to the Spam folder.
Thus, it is vital that you keep your bounce rate as low as possible. If you are sending via Amazon SES, the percentage of bounces must be less than 5%. When it is between 5% and 10%, your account is put on probation. And if you have more than 10% your account will be blocked.
How to Track Amazon SES Bounces with GlockApps
GlockApps is integrated with Amazon SES and provides you with an automated process of handling bounce emails. It tracks bounces and complaints across any number of email campaigns per day, ISP, “From” address, and subject.
It categorizes bounce emails by types so you can see exactly why your emails are bouncing, such as issues related to invalid email addresses, temporarily deliverability issues, or message blocking.
Processed data is compiled into the comprehensive and easy-to-read report available for you every day. You can enable email notifications to get the report download links via email.
Follow the steps below to set up Amazon SES bounces monitoring in GlockApps
1. Add Amazon SES and SNS Permissions to the User.
Login to your AWS console in the browser.
Go to “My Security Credentials”.
Click on “Users” at the left side.
Click on the user.
Click “Add Permissions”.
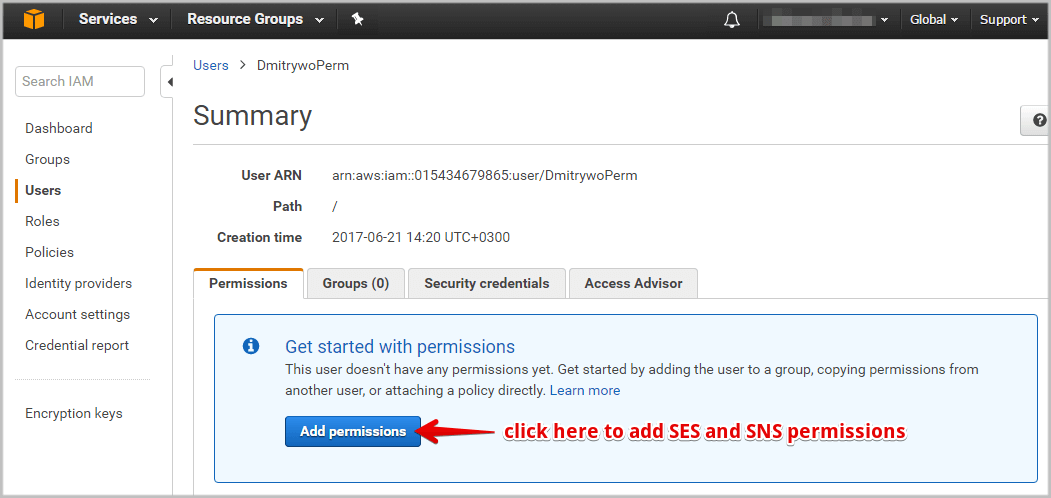
Click “Attach existing policies directly”.
Type SNS in the search field.
Check the box next to AmazonSNSFullAccess policy.
If your user does not have the SES permissions, type SES in the search field and then check the box next to AmazonSESFullAccess policy.
Click “Next:Review” and then “Add permissions”.
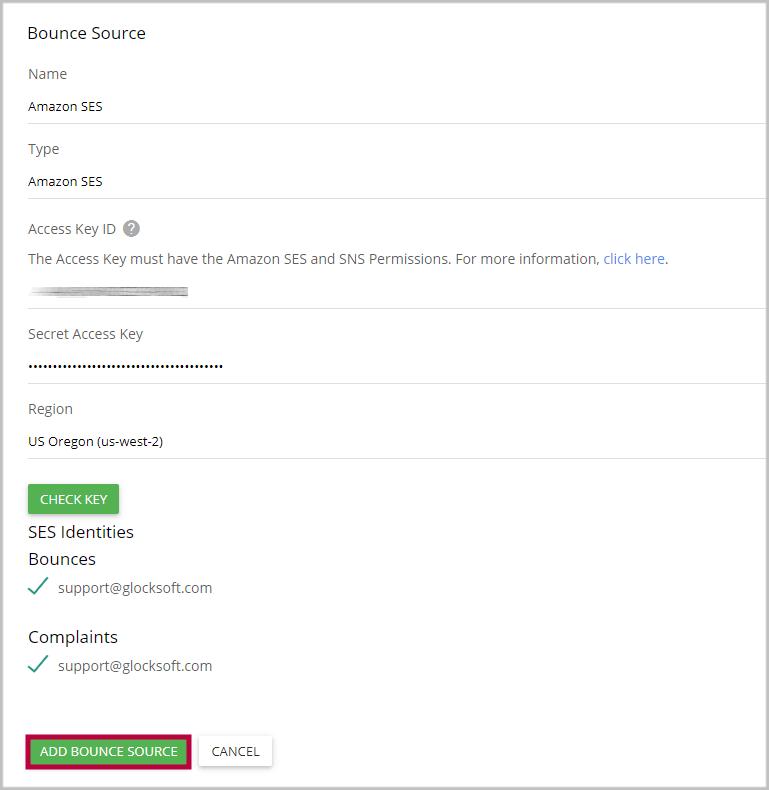
2. Add Amazon SES as Bounce Source in GlockApps.
Navigate to Bounce Monitor -> Settings in your GlockApps account.
Click “Add” next to “Bounce Source”.
Enter a bounce source name (any name for your convenience).
Select the type – Amazon SES.
Copy-paste your Access Key and Secret Access Key.
Select the region.
Select the types of bounce emails you want to track: bounce and/or complaints.
Click “Add Bounce Source”.
3. View Bounce Analytics.
When bounce and complaint emails happen, the GlockApps Bounce Monitor will process SES SNS bounce notifications and deliver bounce analytics and reports to you.
Navigate to Bounce Monitor -> Analytics to view the bounce data by sender domains and email addresses.
Under “Live Feed” you have an aggregate report about all bounce emails.
You can export the bounces from your GlockApps account and load them into the suppression list in your email system so the next time you shoot a campaign to the same list they will be excluded.
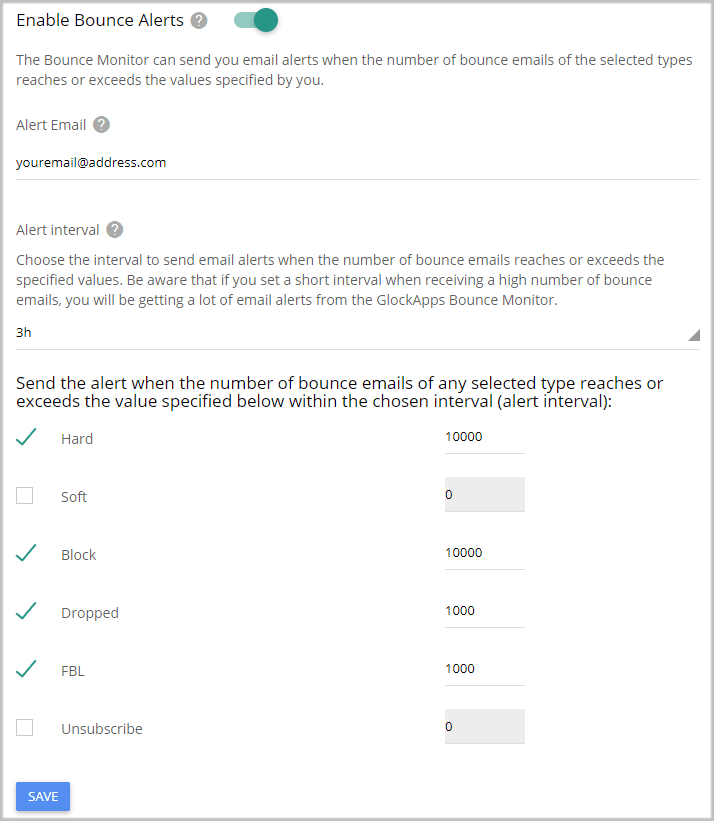
Receive Alerts about Bounce Emails
The Bounce Monitor can send you email alerts when the number of bounce emails reaches or exceeds the values specified by you. It helps you identify the peaks of bounce emails and understand which email campaigns generated the highest bounce rate.
Amazon SES will suspend the user’s account if the bounce rate is equal or exceeds 10% of the volume of sent messages during one campaign. With the Bounce Monitor alerts, you will be proactively informed when the quantity of your bounce messages is reaching the allowed threshold.
You can activate the sending of the alerts in the Bounce Monitor Settings.
Fill in the fields:
Alert email – enter the email address to receive the alerts.
Alert interval – choose the interval to send email alerts (from 5 minutes to 24 hours)
Be aware that if you set a short interval when receiving a high number of bounce emails, you will be getting a lot of email alerts from the GlockApps Bounce Monitor.
Check the boxes next to the bounce types you want to receive alerts about and enter the number of bounce messages to be used as the control value.
Click Save.
The alert will be sent when the number of bounce emails of the selected types reaches or exceeds the control value within the chosen alert interval.
How to Reduce Bounce Rates from Email Marketing Campaigns
Mailbox providers tend to protect their customers from spam. And Amazon SES takes proactive steps to decrease the risk for your email to be considered spam by mailbox providers.
In order to meet the Amazon SES terms of use, you should follow the best email marketing practices:
1. Keep your lists valid and active.
Email marketing tools like EasyMail7 handle bounce email processing after sending email campaigns, but the biggest problem can happen after the first campaign.
Thus, if you are not quite sure about the quality of your list, you should use email verifier software or service to clean your list before shooting your first campaign.
2. Do not use purchased, rented, or scraped lists.
Good email addresses are never sold or shared. If you can buy the list, others can do the same. You will be contacting people who don’t want to hear from you, and that will automatically lower chance for your email to be opened.
But the biggest problem is spam traps that are likely to exist on purchased and scraped lists. No email verifier can determine spam traps. So, you put your sending reputation ar a big risk by sending to not opt-in and confirmed lists.
3. Provide an unsubscribe link.
Put the unsubscribe link in a prominent place. The more visible the unsubscribe link is, the more recipients will prefer clicking it over reporting your email as spam. To minimize spam complaints, it is also recommended that you inform the recipients why they’re receiving an email from you.
4. Do not use misleading subjects, “From” names, “From” and Reply-to” addresses.
The subject line must hint what your email is about. If it is deceptive, people may report your email as spam and ignore your subsequent messages.
The “From” name should clearly indicate who sent the email. It is preferable to use your name or your organization name as your email “From” name rather than an email address alone.
One of the biggest mistakes is sending from a “no-reply@” email address. Some ISPs, spam filters, and customer’s personal email security settings are set up to move messages with “no-reply” addresses to the junk folder. You also miss a chance to be whitelisted by a recipient and deliver your emails to their Inbox.
5. Send relevant and engaging content.
One of the most important factors influencing sender reputation is recipient engagement. If people open, click, reply, forward or save your emails, mailbox providers know that your messages are wanted and place them into the Inbox.
With that said, it’s important that you send emails with content relevant to the recipient’s interests and preferences. Engage recipients into a conversation by asking some quick questions. Let them share their opinion on something or leave a feedback to you by replying your message. The more the recipient interacts with your messages, the better your sender reputation will be and the more emails will go to Inbox.
If you follow the above practices you will be able to lower your bounce and complaint rates and increase your Inbox placement. The GlockApps spam testing tool will help you test and monitor your deliverability and detect issues before you shoot a campaign to your entire subscriber base.
Related Posts
For startups, email is more than a marketing channel. It is often responsible for product updates, account verification, onboarding sequences, Read more
SendGrid is a powerful email delivery platform used by businesses for transactional emails, marketing campaigns, product notifications, newsletters, and automated Read more
Unsubscribing should be simple. When people no longer want to receive marketing emails, newsletters, or promotional campaigns, they should be Read more
Delayed email delivery can happen for many reasons. Sometimes the delay is caused by the sender’s mail server. Sometimes it Read more