What is DKIM – DKIM Checker

The DKIM protocol, along with SPF, DMARC, and BIMI form the perfect ensemble for email security. Any one of those email authentication methods can safeguard your email server, but it would be limited and could result in expensive security breaches.
The only way to ensure that your email servers are fully protected is to set up all 4 forms of email authentication. This will also improve your email deliverability and reputation because mailbox providers will see you as a responsible, authenticated email sender.
This article will cover:
What is DKIM?
DKIM, or DomainKeys Identified Mail, helps ensure that the email message you originally sent to your audience has not been changed during transit.
The DKIM standard allows the receiving mail server to verify that an email message is authentic and really came from you. When the email server checks your DKIM signature header, it shows that components of your mail message, such as your message body, links, and attachments, have not been altered.
Benefits of Implementing DKIM
- Ensures your message content and attachments are exactly the same as when you clicked “send”.
- Improves your email sender reputation and increases email deliverability
- Works together with SPF and DMARC to provide stronger protection against spoofing and phishing attacks.
Difference between SPF vs DKIM
DKIM works differently than SPF. SPF focuses on validating who (IP addresses) is sending the message, but DKIM focuses on validating what (subject, body, attachments, etc.) the sender is sending.
DKIM, like SPF (Sender Policy Framework), is used to complete DMARC alignment. However, DKIM is superior to the SPF record in the sense that its encryption key won’t break when your email message is forwarded.
Regardless, both SPF and DKIM are necessary in order to obtain maximum email security and improve your email deliverability.
How does DKIM work?
There are three components that you have to know about in order to understand how DKIM works:
- The Private Key for your mail server
- The Public Key in your DNS records
- Your message’s DKIM signature header
Together, these three DKIM keys allow your DKIM authentication to pass.
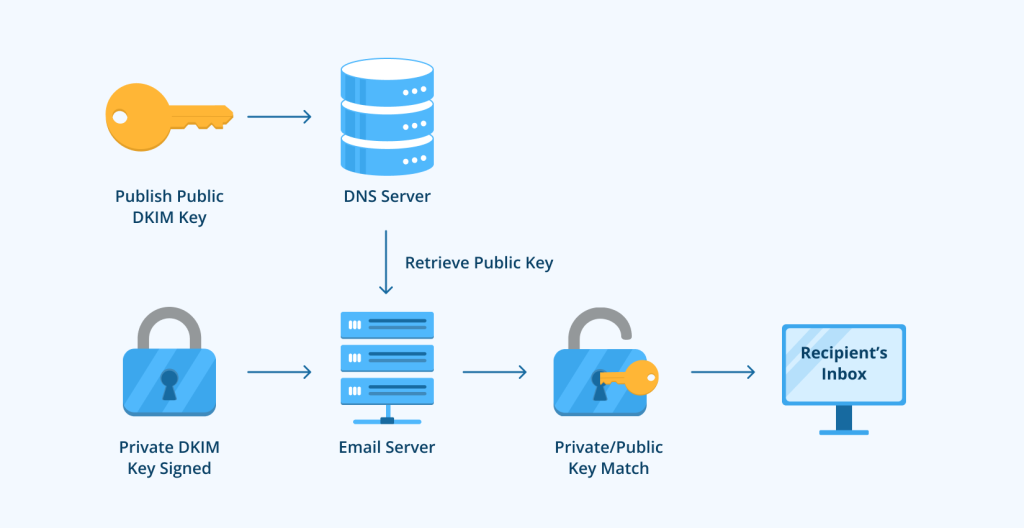
When you set up DKIM for your sending domain, you have to add a DKIM record to your domain’s DNS record. This DNS TXT record will contain a public key (usually provided by your email provider).
When an inbound mail server receives a signed message, it detects the message’s digital signature in its header and starts searching for the public key in DNS servers. Then, the receiving mail server verifies that the sender’s public key and their mail server’s private key match.
However, if the email authentication fails because the DKIM signatures didn’t match, it can negatively impact your email deliverability as the mail server may send your message to the spam folder or reject it completely.
What are DKIM Signatures?
A DKIM signature utilizes public-key cryptography.
When you send messages, DKIM creates a cryptographic signature in your message’s header. This encrypted signature includes the “from” address, the email’s subject line, the message body, and other fields the domain owner included in their DKIM record.
The DKIM signature is used along with the sending mail servers’ private key and the sender’s public key in the DNS records to verify the email’s authenticity.
DKIM Signature Example
Here is an example of what a DKIM signature header should look like:
DKIM-Signature: v=1; a=rsa-sha256; d=example.com; s=news;

c=relaxed/relaxed; q=dns/txt; t=1145755832; x=1149019687;

h=from:to:subject:date:keywords:keywords;

bh=MHIzKFY7Kzf3MDAyNzG1Njc5OTAyMjM0MUY3ODlqBLP=;

b=hyjCnOfAKDdLZdKIc9G1q7LoEHiYBiSbzc+yuU2zGrtruF00ldcF

VoG4WTHNiYwG
What is a DKIM Selector?
Your DKIM selector tells receiving mail servers where to find the public DKIM key in your DNS records.
You specify your selector when you create public and private keys using a DKIM wizard when setting up DKIM for your particular domain.
DKIM Selector Example
The selector will sign messages in the header. You can easily find it by sending yourself a message and clicking “Original Message” to see the full or “raw” header. The selector will start with s= in your message’s signature.

Learn more: What do I enter as DKIM selector in DKIM uptime monitor?
How to Set Up DKIM
Since DKIM is more difficult to set up than SPF, fewer companies have implemented this form of email authentication. Unfortunately, those domain owners are still susceptible to having their emails altered during transit and flagged as malicious emails by receiving mail servers.
Email senders should set up their DKIM records to avoid any costly email compromises. If you need any help setting up your DKIM record feel free to contact our Email Deliverability Services team.
Follow these steps to set up DKIM correctly for your email program.
- Identify all your sending sources
- Install DKIM on your mail server
- Create a public and private DKIM key pair
- Publish the public DKIM key
- Hide the private DKIM key
- Configure your email server
- Test your DKIM setup with a DKIM Checker
1) Identify all your sending sources
To avoid DKIM failure, make sure you list all the sources that send emails from your domain. This includes any platform used for:
- Email Marketing
- Marketing Automation
- Customer Service Email Management
- Customer Relationship Management
2) Install DKIM on your email server
In order to implement DKIM, you need to install a DKIM package on your mail server. The package will depend on your sending platform’s operating system.
Verify your platform’s DKIM software by referencing DKIM.org, or check with your vendor.
If you use an email service provider, work with them to set up your DKIM record.
3) Create a public and private DKIM key pair
In order to create a public and private DKIM key pair, use a DKIM key wizard.
As you generate your DKIM keys, you are also specifying your selector. The DKIM selector tells mail servers where to find your public key. Therefore, you should name the DKIM selectors with descriptive roles (example: marketing, newsletter, etc).
Note: Make sure your DKIM selector key is 1024-bit or higher.
4) Publish the public DKIM key
The DKIM wizard should generate a selector record that looks like this:
(selector)._domainkey
Go into your DNS records and add a TXT record with that name.
The value of the record is a specially-formatted version of your DKIM key as well as some identifying information that tells recipients how to interpret it.
The complete TXT record will look something like the DKIM record for GlockApps.com:
default._domainkey.GlockApps.com. v=DKIM1; k=rsa; p=MIIBIjANBgkqhkiG9w0BAQEFAAOCHKJSjnoKJKJkdpajpfjaAvhEfRngihufN83moF4MISGU+/sTzeW7djI4fuBkmryhqSDWpkhbFUTPWHCobGXZtpjimNB/GglKimj7hP5HJYBl7efxaohv5Ucs3BTo7u3UwXEDVmcAgEUh+jYxMTs7L5EM/MjcKRKNvDEsGfvFBuILEaDCD4ftC7PusidisdoiasunHUDHSBEHSWH ohHFCez2xlm0713e6rGNTgn zyptGQ3pyUNlmNI7sFkKi8UDJv/8Drndo6YCTZTw11POar9IaipbTt40rHlReps4SMtoXaSKqrrTAQHl3KcAdcwl6ZnLBA67VjN6ih+7Ta5yh2h+FaSENXM26613Am3jdtoBO4IrOZTDziabqcp4wIDAQAB
Note: It can take up to two days to see any changes in your DNS.
5) Hide the private DKIM key
Your DKIM package will tell you where you should store the private key that was generated by the DKIM wizard.
6) Configure your email server
A domain owner may have to do some further configuration in order to finish setting up DKIM for their domain name. Reference the installation instructions for your email server to ensure your email messages are properly authenticated.
7) Test your DKIM setup with a DKIM Checker
After you’ve finished the previous steps, run an authorization test to check if your DKIM is working properly.
We recommend using a DKIM Checker.
DKIM Checker

The GlockApps DKIM Checker allows you to check DKIM records for your sending domain.
Our DKIM record checker just needs your signing domain and your selector name. Then, you will get a report with your full DKIM record, including your tags and explanations.
Conclusion
The DKIM standard (DomainKeys Identified Mail) is the best way to ensure that your emails are not altered during transit. However, DKIM cannot completely protect your internet mail by itself. You should implement all email authentication protocols (DMARC, BIMI, SPF, and DKIM) to fully protect your domain and your recipients from phishing and spoofing cybercriminals.
Free DKIM Lookup
Learn More About DomainKeys Identified Mail (DKIM):
What is SPF (Sender Policy Framework) and How to Set it Up
What is DMARC: Using a DMARC Record to Protect Your Domain
The Ultimate Guide to Email Authentication
What’s the difference between DKIM AUTH/EVAL and SPF AUTH/EVAL?
Related Posts

DKIM (DomainKeys Identified Mail) is an effective email authentication method that ensures the integrity and authenticity of your emails while Read more

An email authentication technique called DomainKeys Identified Mail (DKIM) helps safeguard email senders and recipients from spam, spoofing, and phishing. Read more

Email is an effective tool for corporate and personal communication in the digital age. But as phishing scams and email Read more

A lot of the cyberattacks begin with a phishing email. This emphasizes how crucial email security is. Brands sending email Read more