Improving Email Deliverability Using MX, SPF, and PTR Records

When an email goes from the SMTP server to the target recipient, it passes through numerous checkpoints, from local firewalls to ISP spam filters. One of the checks that the receiving server does is the verification of the sender’s domain authenticity.
To help mail servers effectively determine that the email you are sending should not be classified as spam, you need to set up MX, SPF and PTR records for your domain.
Below is the guide on how to do it.
What is MX Record?
MX stands for “mail exchanger”. An MX record specifies the mail server responsible for accepting email messages on behalf of a domain name.
Why It is Important to Set up MX Records
Failing to set MX records will result in any email sent to you not being delivered. If your MX record doesn’t point to the SMTP server you are sending the email from, it is highly likely that your email will be filtered as spam by email receivers.
Thus, the first step for better deliverability is to make sure that, where possible, the MX record for your domain points to the server(s) you are sending the emails from.
You can edit or add an MX record in your domain’s account at your domain host. Go to the section where you can update your domain’s MX records. It might be called something like “DNS Management,” “Mail Setting” or “Advanced Settings.”
When you are done, click Save to save the changes.

What is SPF Record?
The Sender Policy Framework (SPF) is a system that allows domains’ owners, system administrators, and email senders to specify their servers which should be recognized as authorized to send emails on behalf of their domain(s). A configured SPF record allows email receivers to confirm that the email they have received is from a permitted source for the applicable domain.
Depending on the configuration set for the domain, one of the following actions can be completed for the email during SPF check: filtering the email to the user’s spam box, blocking the email completely, or allowing the email to the user’s inbox.
When creating the SPF record it is important to make sure that it does not affect any existing settings for any external email system you use. It is recommended to read the documentation supplied by your email service provider on their particular SPF record implementation.
The SPF record needs to be added to your domain’s DNS via your DNS administration system or cPanel.

When setting up an SPF record, it is important to keep in mind two things:
- You can have only one SPF record set for a domain. Multiple SPF records are not permitted by rfc7208. Specify all the IP addresses or sending sources you use in one SPF record. Having more than one SPF record will lead to an SPF check error.
- The SPF record must have no more than 10 lookups. Each time an email message reaches an email service host, the host queries the DNS to perform SPF check. The SPF specification enforces that the number of mechanisms and modifiers that do DNS lookups does not exceed 10 per SPF check, including lookups caused by the use of the “include” mechanism or the “redirect” modifier. If this number is higher than 10 during an SPF check, a PermError is returned.
Read more: How to Deploy SPF Authentication
What is PTR Record?
A PTR record stands for “DNS pointer record”. It points from an IP address to a text-based domain name. Email receivers use PTR records for the process called “forward-confirmed reverse DNS”. This is a very commonly used and effective check for anti-spam purposes.
The process works as follows:
- An email receiver takes the IP address that the email is received from and does a PTR lookup (reverse lookup).
- The text record that is returned is then used to do a lookup on the A record (forward lookup).
It is expected that the result returned for the A record provides the same IP that the email is received from.
Why It is Important to Set up PTR Records
When email services receive a message, most of them do a simple test.
They run a DNS lookup simultaneously with a Reverse DNS lookup and compare whether the results match. If they don’t match or there is no PTR record, an email is likely to be filtered to ‘spam’ or even discarded.
PTR records protect email domains from abuse. For example, if an email is sent from emaildomain.com but a PTR record is configured for emaildomain.info, resolving an IP address with a PTR lookup (Reverse DNS lookup) won’t point to a real domain. This will send a signal to an MTA and will likely result in the email being discarded.
PTR records are also important for website owners in terms of getting analytics about which IP addresses visit the website pages. Thanks to Reverse DNS lookup you can see the hostnames or domains of your site visitors, and get some valuable information from it.
How to Set up PTR Records
The steps for adding a PTR record depend on your hosting provider. Some hosting providers allow you to add one in your admin panel. With others, you need to reach out to the support team so they can set this up for you.
Assuming that you can add a PTR record yourself, here are the steps:
Step 1.
Find the IP address of your mail server using a command-line tool:
$ host [mail.yourdomain.com]
Step 2.
Find your IP Netblock. A Netblock is the range of IP addresses that your addresses are in. These blocks are usually owned by your ISP (Internet Service Provider). Enter the IP address you got in step 1 into the ARIN lookup tool. The answer will show the IP Netblock that your address is in and the organization that owns your address.
Step 3.
Ask the provider identified in step 2 to delegate your IP block to your DNS provider’s name servers. Typically, an ISP will only delegate the reverse DNS if you have 256 IPs (a full class C) or more, but some providers can make an exception. If your provider doesn’t agree to delegate the reverse DNS to your DNS provider’s name servers, then you will have to set up your reverse DNS with that provider.
If your provider agrees to delegate your IP block to another provider, you need to give them the list of name servers you want to have your reverse zone delegated to. You will also need to ask them for the zone name for your block. This is a special zone (domain) that ends with “in-addr.arpa”. “In-addr.arpa” a second-level domain suffix that’s added to all the addresses in IPv4. If you use a more common IP in the IPv6 system, a PTR record’s address will end with ip6.arpa. You need to add this domain to DNS, just like you would add any other domain.
Step 4.
Create a PTR record under your reverse DNS domain that points your IP address to your hostname.
After the record is set up, run a quick check using the command line to verify that your PTR record is working:
$ dig -x [your IP address]
If it is working, you can confirm that you’ve reached a Forward-confirmed reverse DNS (FCrDNS).
Learn more about SPF: What is SPF Record: How to Create, Optimize and Check It
Is It Possible to Have Multiple PTR Records?
By definition, a PTR record can only point to one hostname. Although DNS doesn’t limit the number of PTR records you can have, having more than one PTR record is not recommended. Email services expect only one entry for each IP address. When multiple PTR records are defined for one IP address, an email service can pick up a random one during a Reverse DNS lookup. And it may not always match the A record.
Unlike MX records, you can’t specify the priority for PTR records. Setting up multiple PTR records for an IP doesn’t make you look trustworthy for email receivers and can result in a failed verification of A/PTR records and lower the potential of the email to be delivered.
Having multiple PTR records for a single IP address could work when you had several domains registered, each pointing to the same IP address and opening the same website when entering an address. To get the PTR records right, you need to resolve that IP address for each of your domains – otherwise, you won’t have a match.
Learn more: The Ultimate Guide to Email Authentication
How to Verify MX, SPF, and PTR Records
There are online tools such as MXToolbox where you can verify MX and SPF records for a domain and PTR records for an IP address.
GlockApps offers you the free Gappie bot for Telegram and Slack that does the above checks.
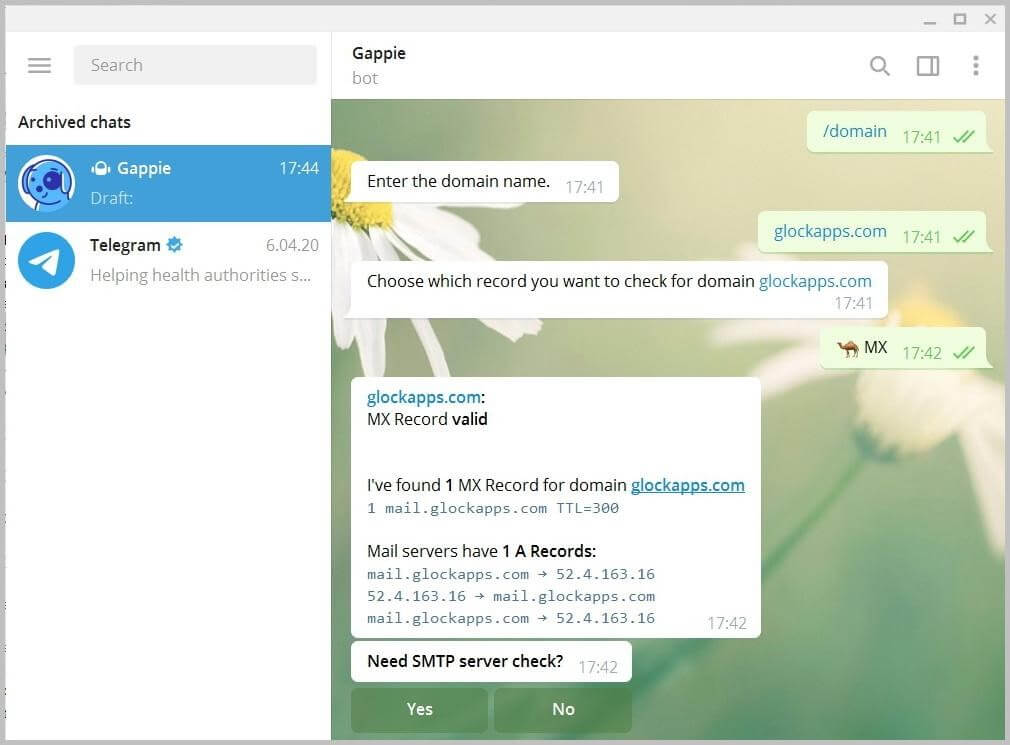
Enter the /domain command in Gappie, type the domain name, and choose the record that you want to check: DMARC, SPF, or MX.
Click MX and in a moment you’ll see the result.
MX check in Telegram
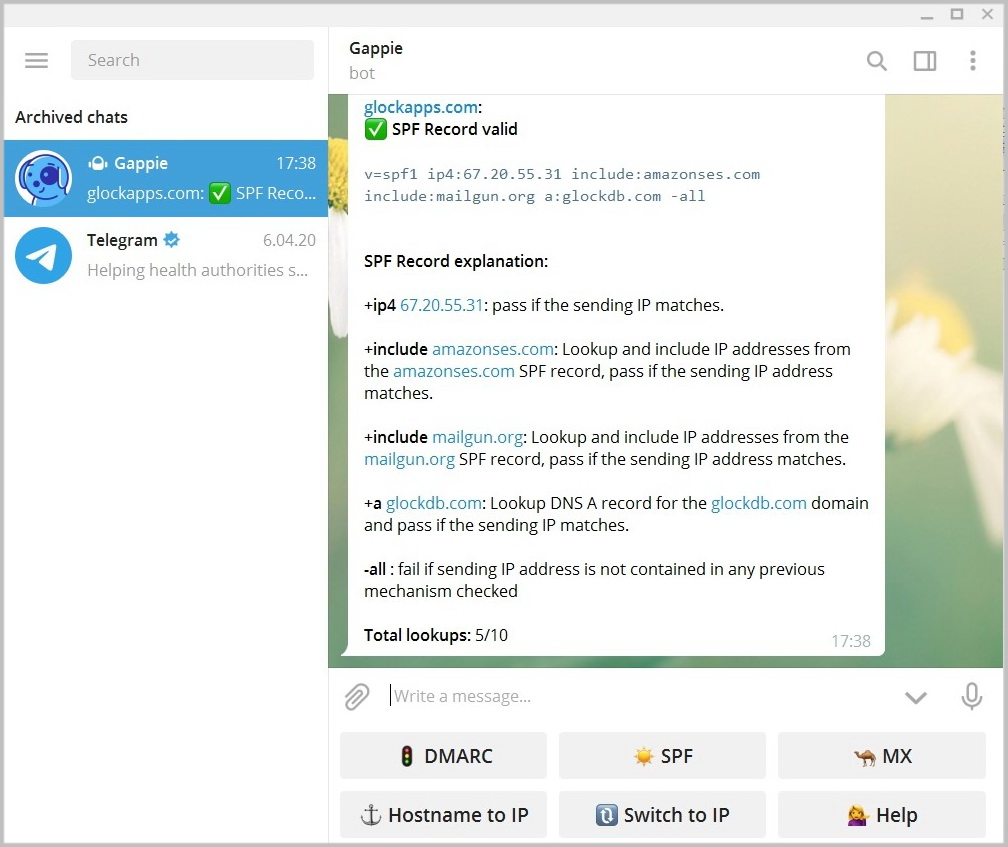
For SPF check click SPF and see the result.
SPF check in Telegram
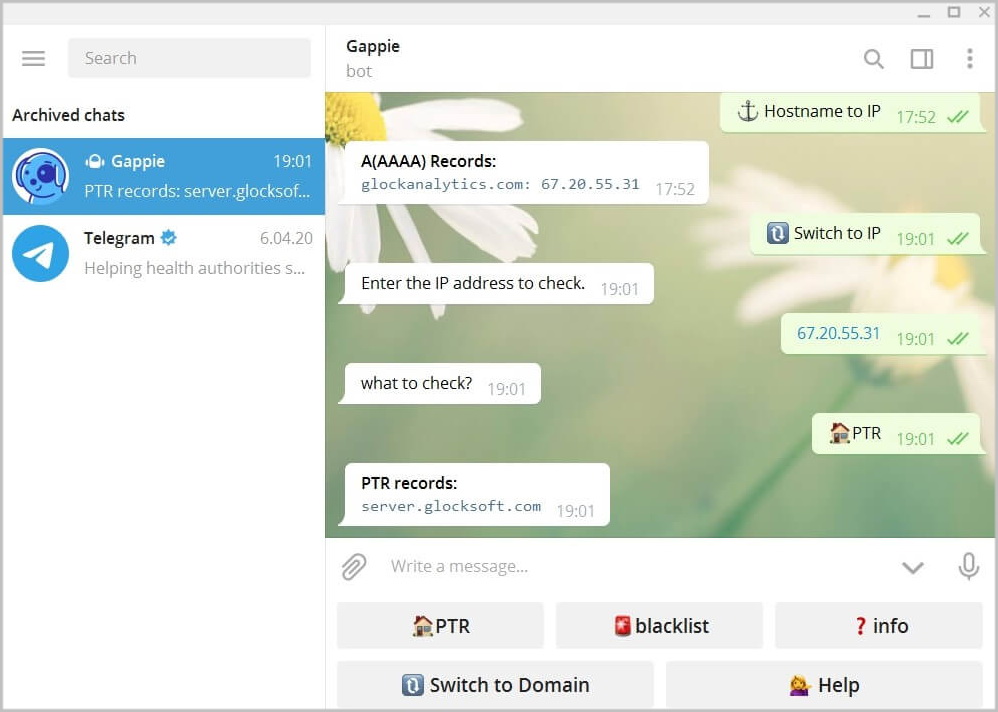
Click “Hostname to IP”, enter the IP address and click PTR.
PTR check in Telegram
In addition to quick checks, Gappie can send you instant notifications when anything suspicious like the below occurs:
- A drop in your DMARC compliance rate
- A surge of email traffic from your domain
- Changes in the DMARC or SPF DNS records
- DKIM, SPF, or DMARC authentication failures in traffic from your legitimate sources
Related Posts

For startups, email is more than a marketing channel. It is often responsible for product updates, account verification, onboarding sequences, Read more

SendGrid is a powerful email delivery platform used by businesses for transactional emails, marketing campaigns, product notifications, newsletters, and automated Read more

Unsubscribing should be simple. When people no longer want to receive marketing emails, newsletters, or promotional campaigns, they should be Read more

Delayed email delivery can happen for many reasons. Sometimes the delay is caused by the sender’s mail server. Sometimes it Read more