How to Run an Email Spam Test with GlockApps

How to Use Inbox Insight
Ensure Your Emails Reach the Inbox to Improve Your Email Marketing Performance
Deliverability rates determine your email marketing success or failure. Our Inbox Insight tool will test your email across dozens inbox providers and show you exactly where it lands in the mailbox: Primary Inbox, Promotions Tab, or Spam Folder.
Anyone can use Inbox Insight, regardless of the email service provider. This tutorial guides you how you can test your email campaigns and find any deliverability issues before you hit Send in your email service provider:
1. How to Run an Email Placement Test
2. How to Understand Deliverability Report
3. How to Fix “Waiting for Data…”
4. Useful Resources: How to Troubleshoot Email Deliverability Issues
How to Run an Email Placement Test
Log in to your GlockApps account.
Go to Inbox Insight > Dashboard at the left side.
Click “Start Spam Test”.
Choose “Start Manual Test“.
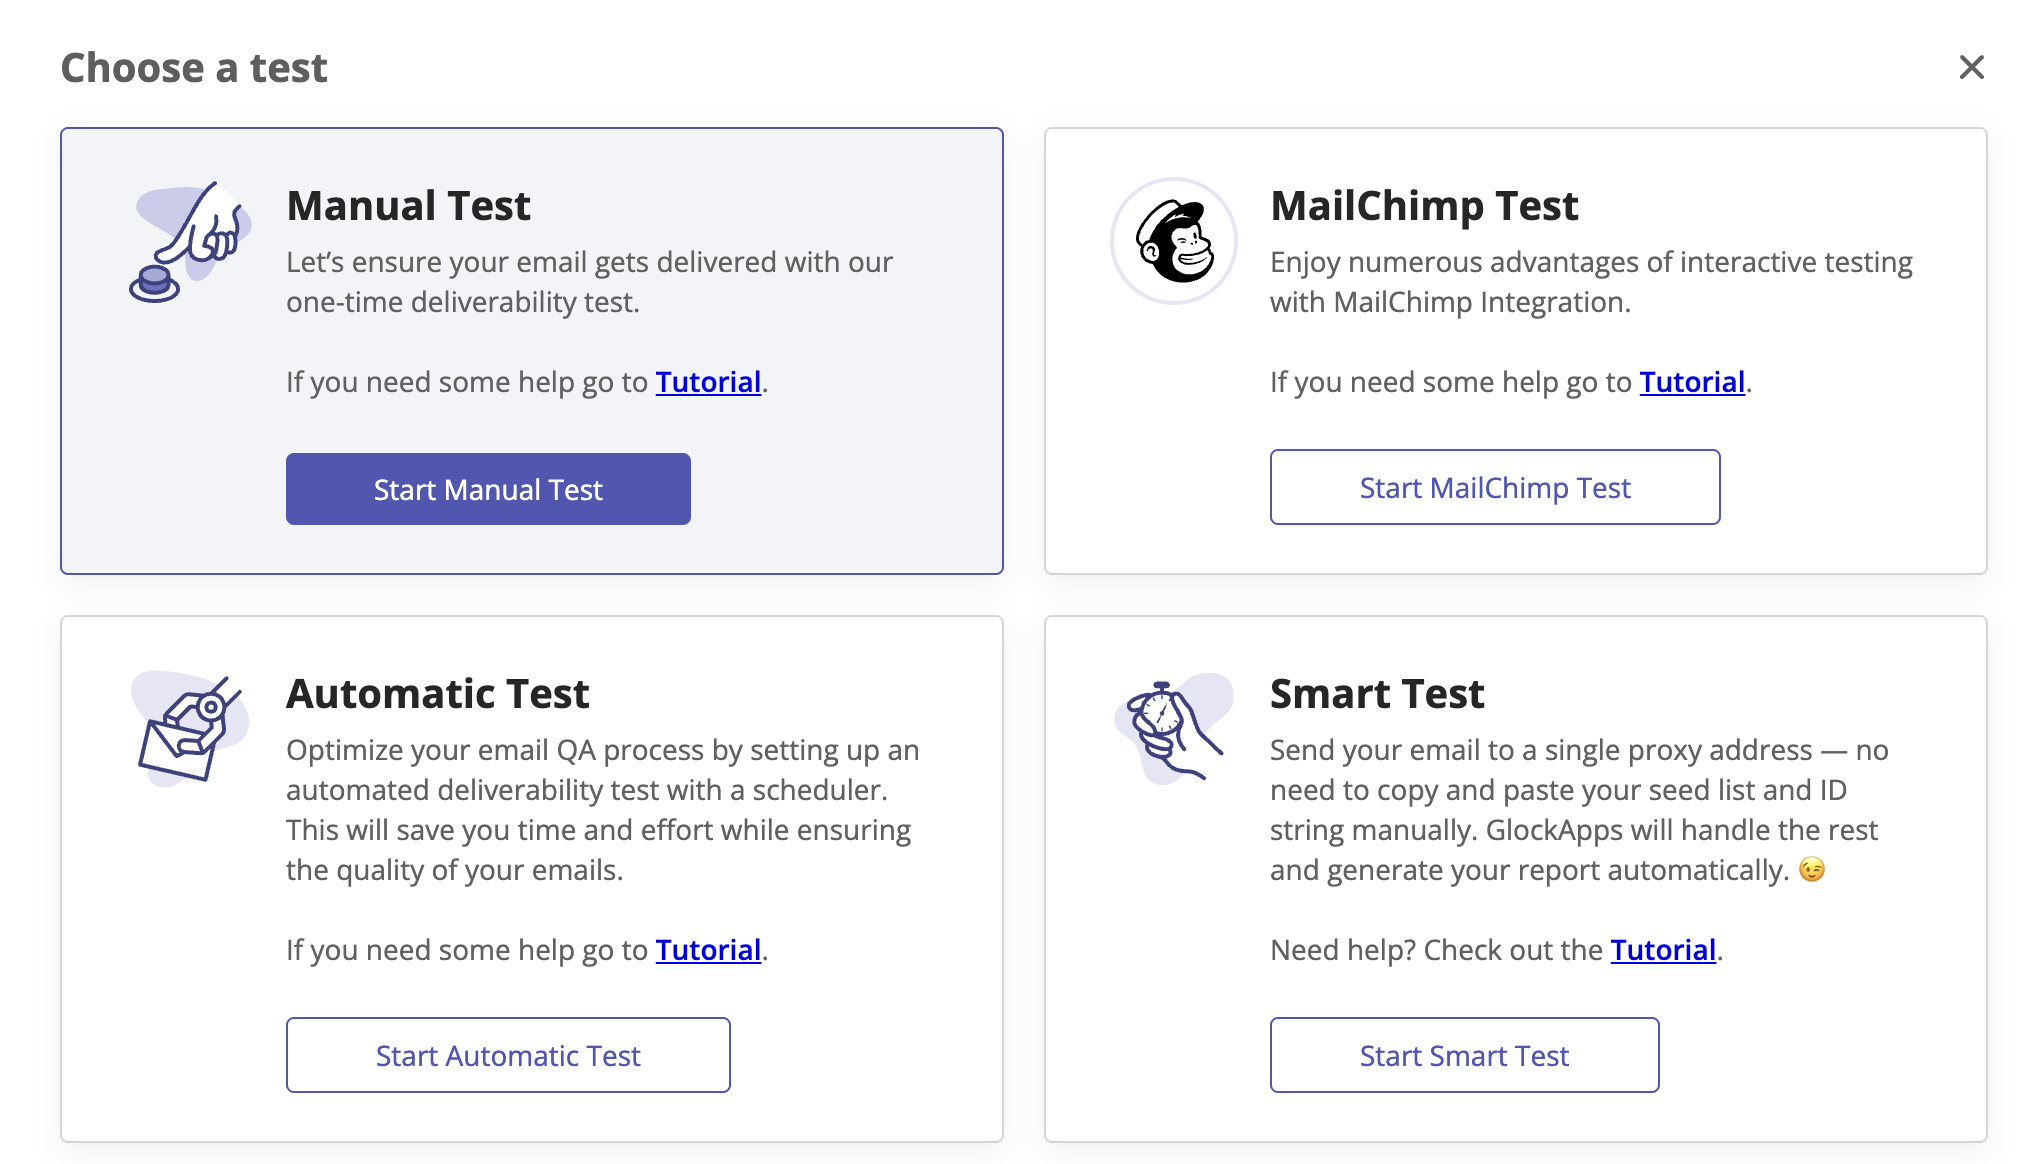
Follow these steps to complete the test and get a deliverability report:
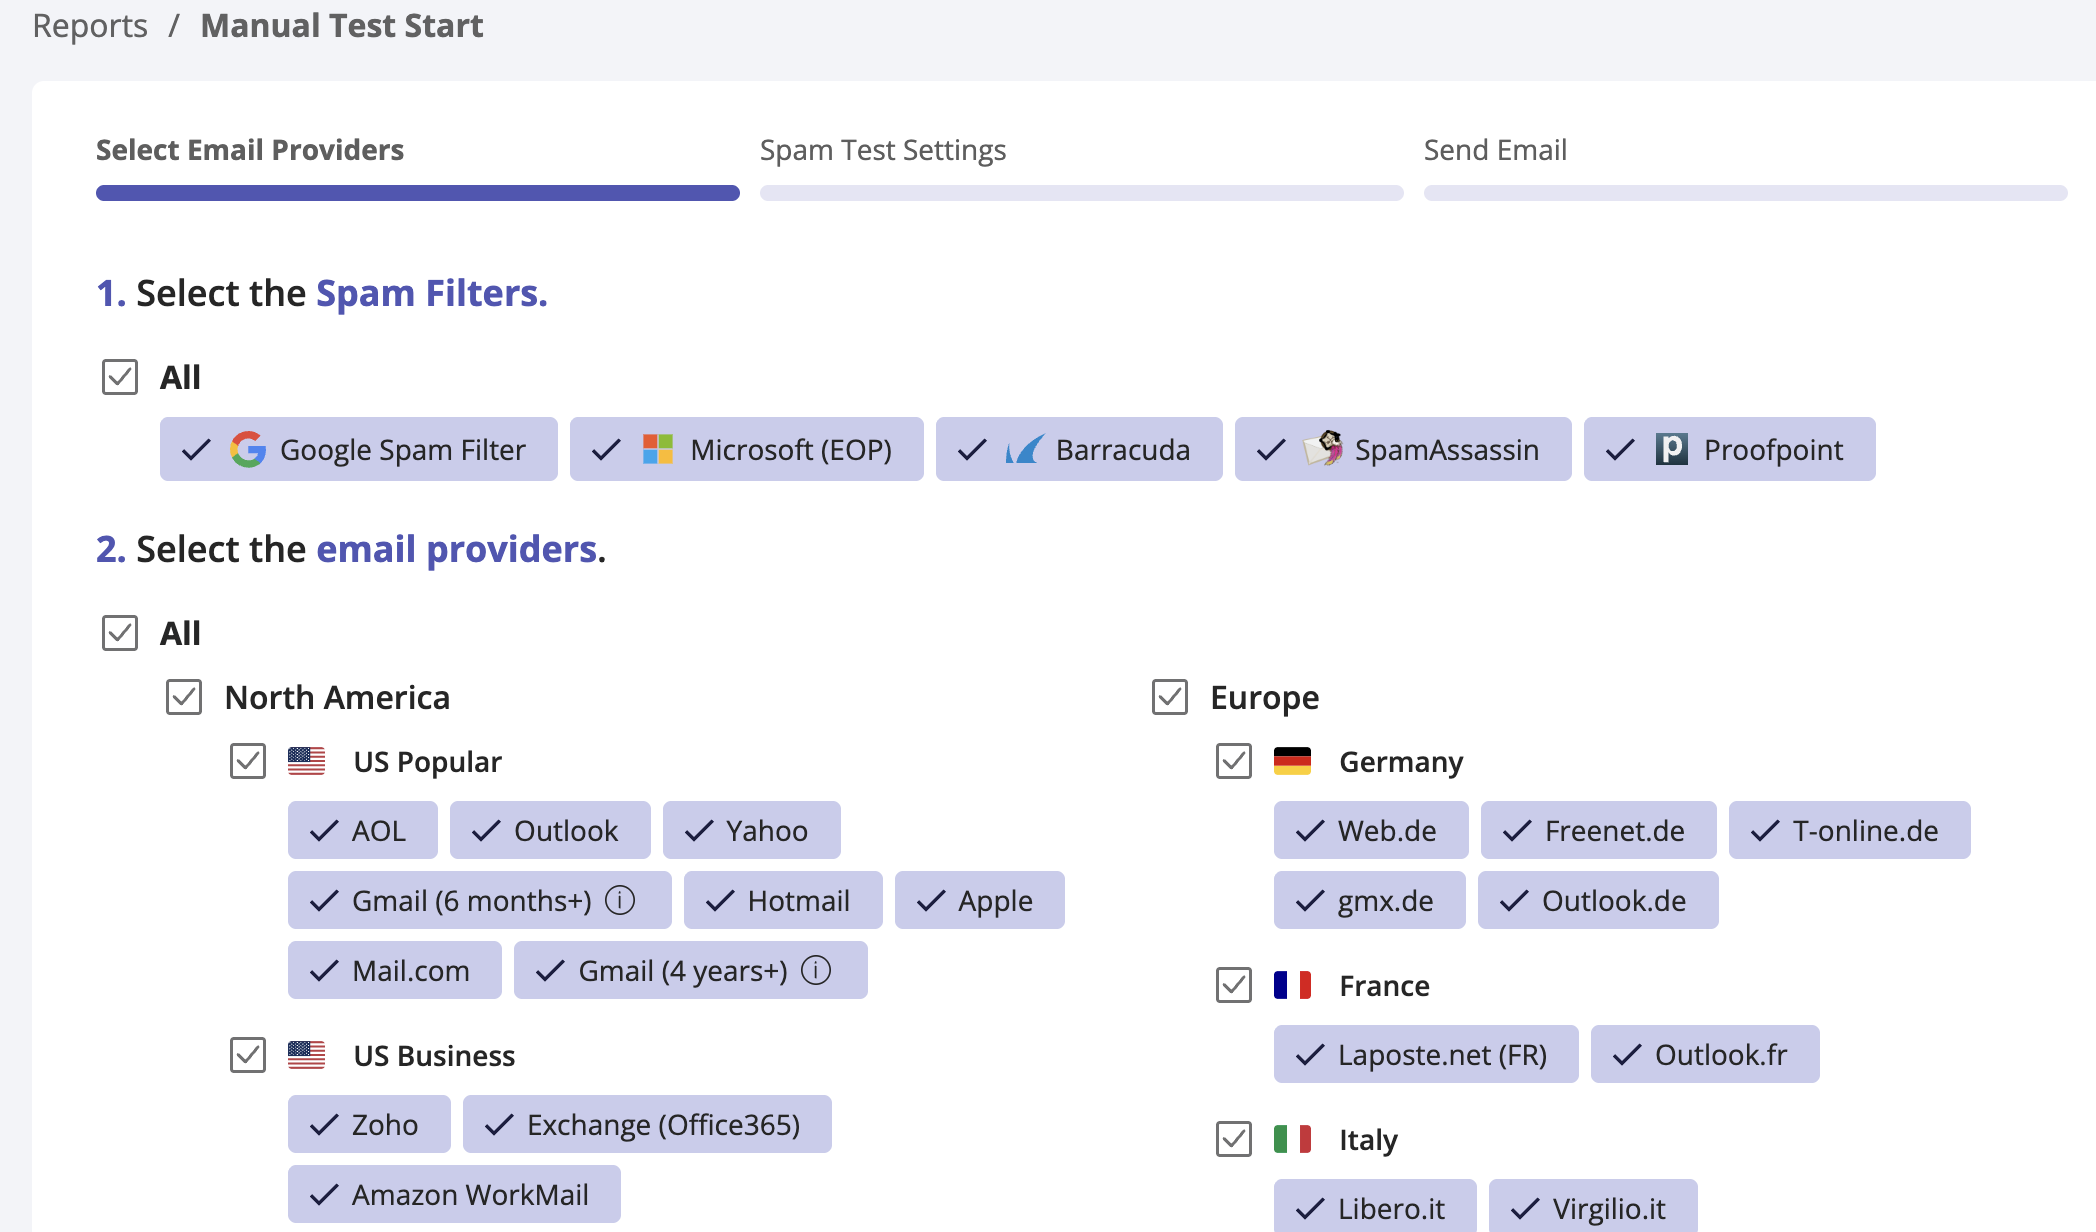
1. Select Spam Filters.
GlockApps can run your email through five major spam filters: Google Spam Filter, Microsoft EOP, Barracuda, SpamAssassin, and Proofpoint.
To select all the filters at once, put a check mark near All.
To select the filters individually, click on the filter to select it.
2. Select Email Providers.
Next, select the inbox providers to be added to the seed list.
To select all the providers at once, put a check mark near All.
To select the providers individually, click on the provider to select it.
Click Next.
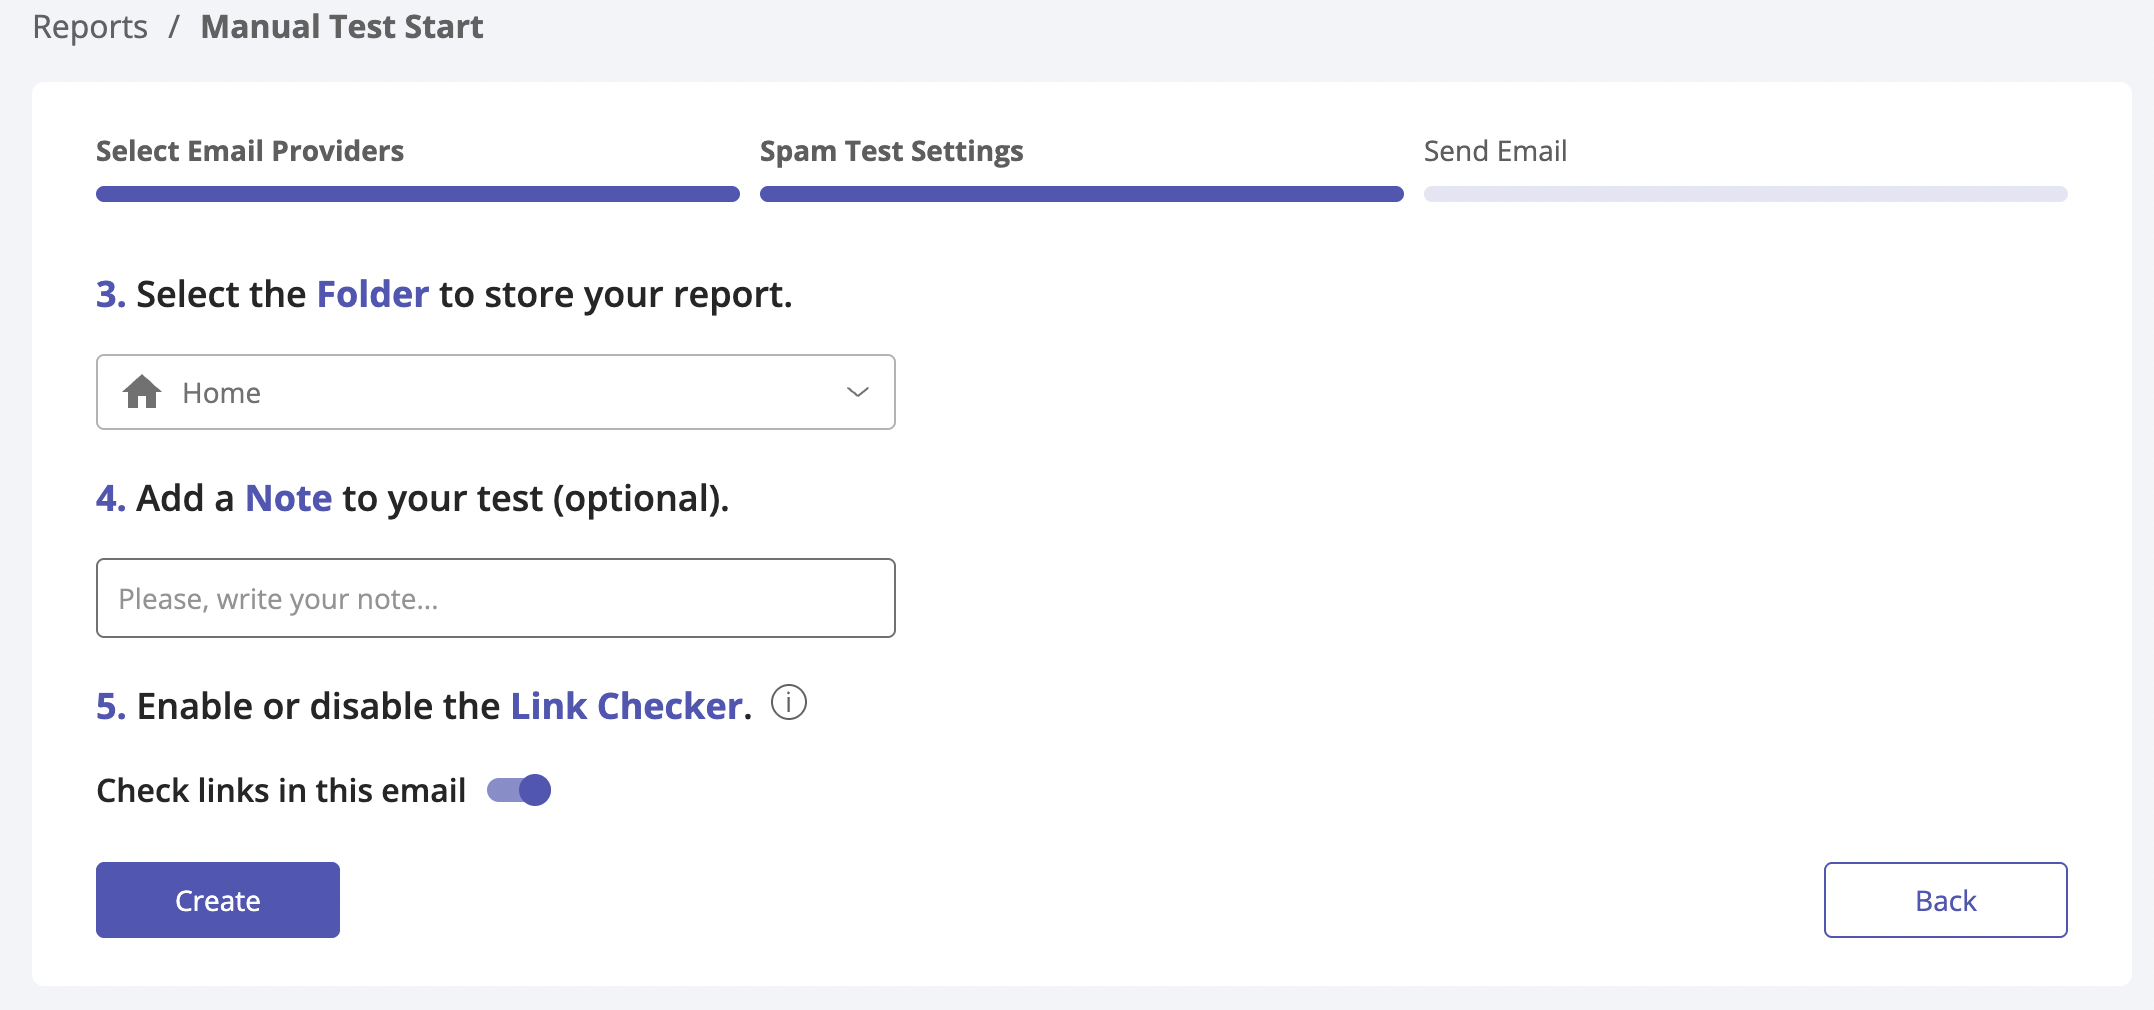
3. Select the Folder.
From the drop down menu, select the folder to save the report to. The default folder is Home. You can select a different folder or add a new folder right from the menu.
4. Add a Note.
Optionally you can write a description or a note for the automatic test.
5. Enable/Disable the Link Checker.
It is recommended to keep the Link Checker enabled. To ensure the validity of each URL (excluding the unsubscribe link) in your message, GlockApps conducts a thorough check. It even goes the extra mile to extract target URLs if you use redirects and scrutinizes the domain in the target URL against domain blacklists, which include Spamhaus DBL Domain Block List, involvement DNSBL, and SURBL multi (Combined SURBL list).
If, for any reason, you don’t want the tool to validate URLs in your email, toggle the “Check links in this email” setting to Off.
Next, click Create.
6. Choose Sending Mode.
At this step, you have to send your message to the GlockApps seed list. Choose any of the supported options::
Send Automatically
You can choose this mode if you connected your email account(s) with GlockApps.
Choose the right mailbox to send the message from.
Choose the message or click to add a new message.
Change the sending pace if needed.
Click “Send Test” to initiate the testing process.
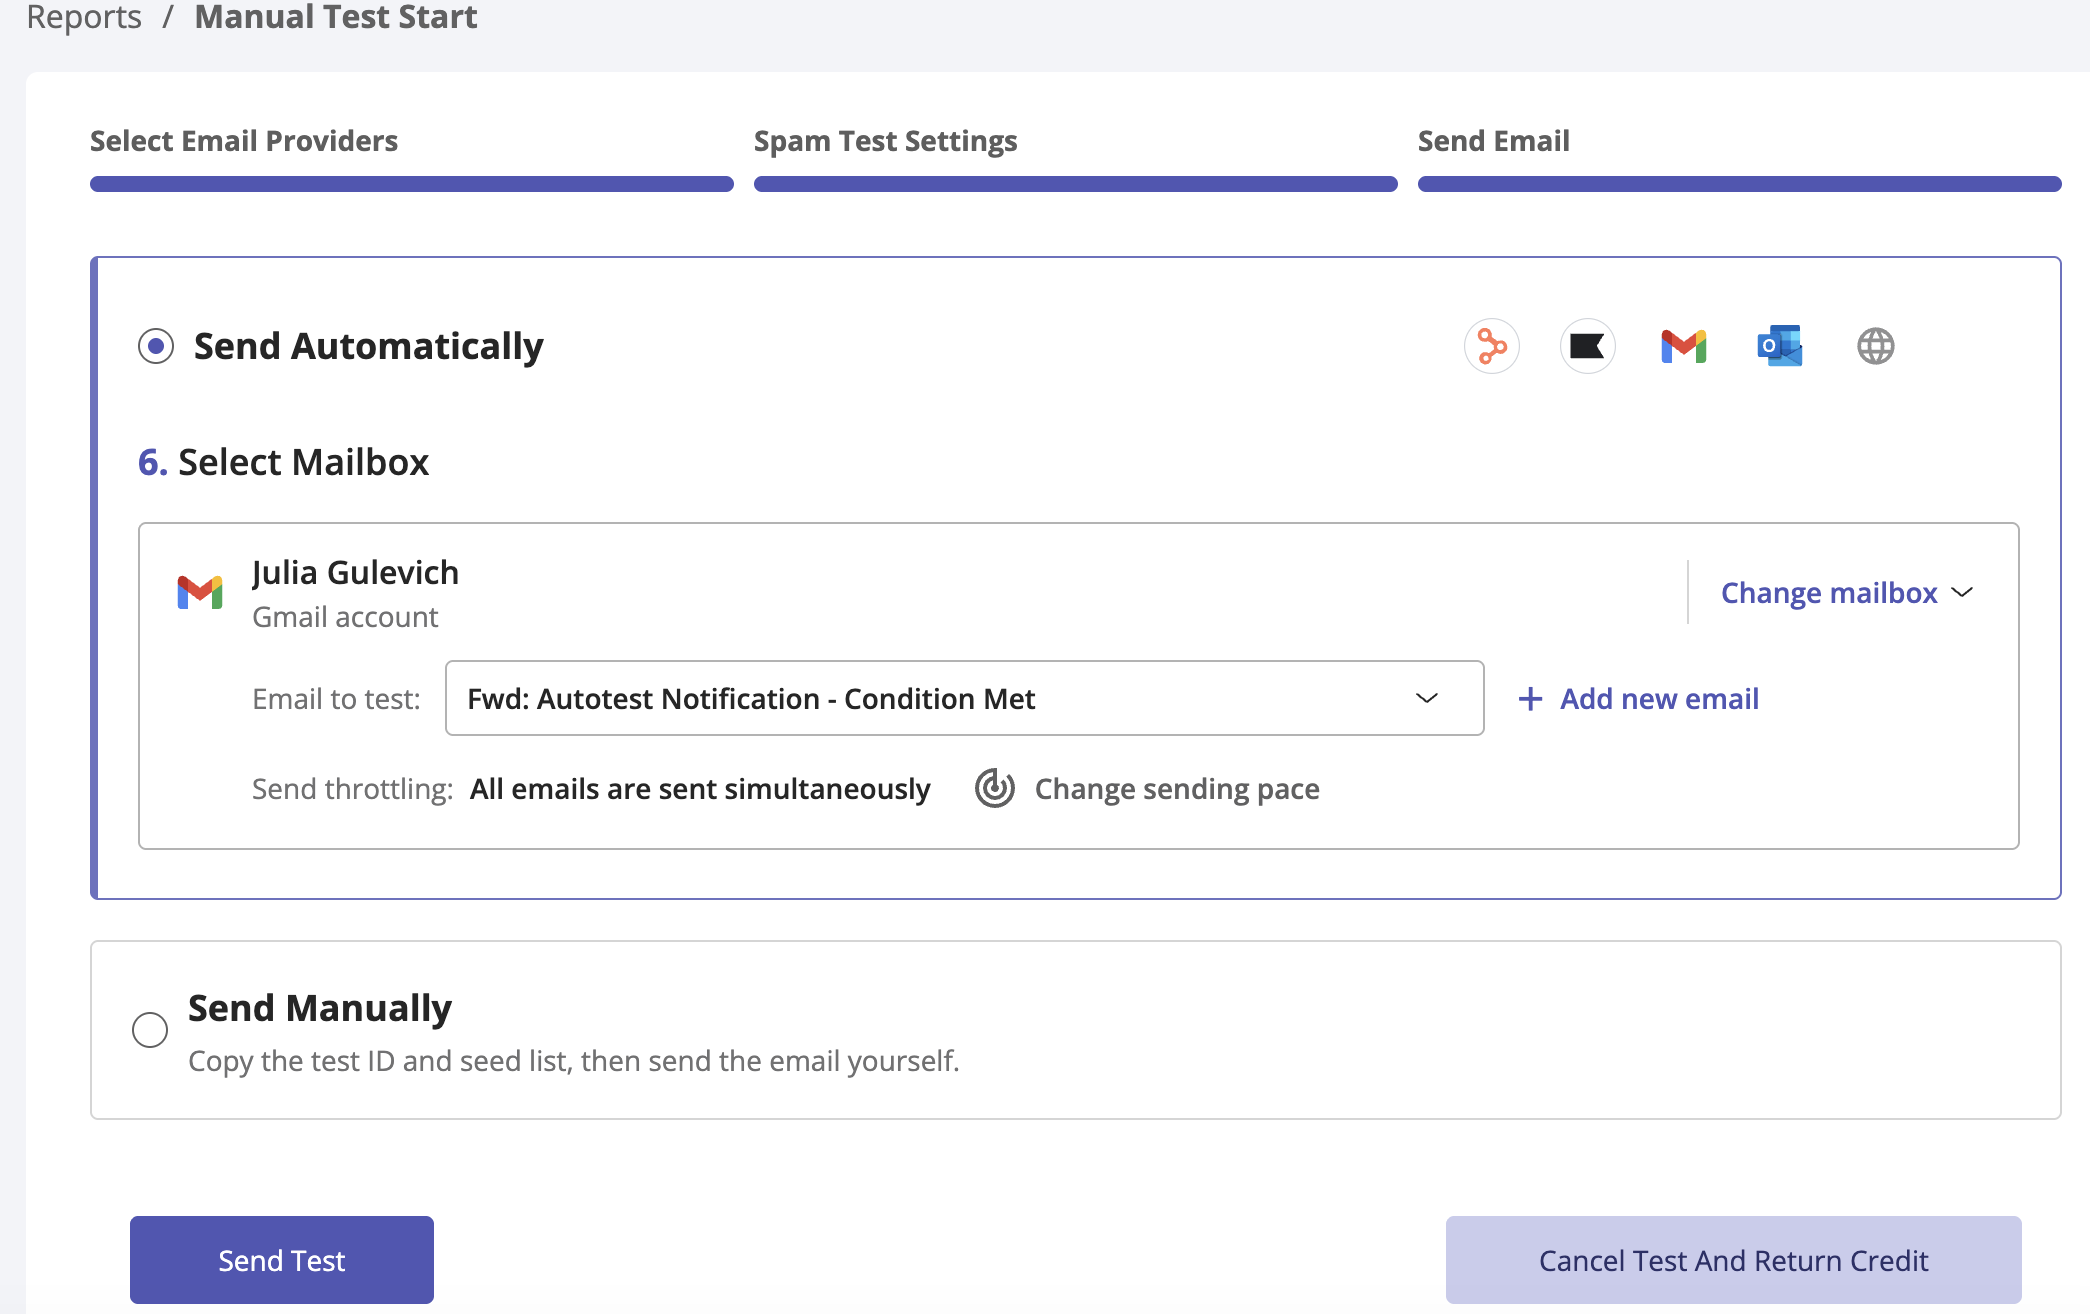
If you have no connected your mailbox with GlockApps yeat, you can choose the manual sending mode.
Send Manually
When choosing this option, you receive the unique id string and the test list.
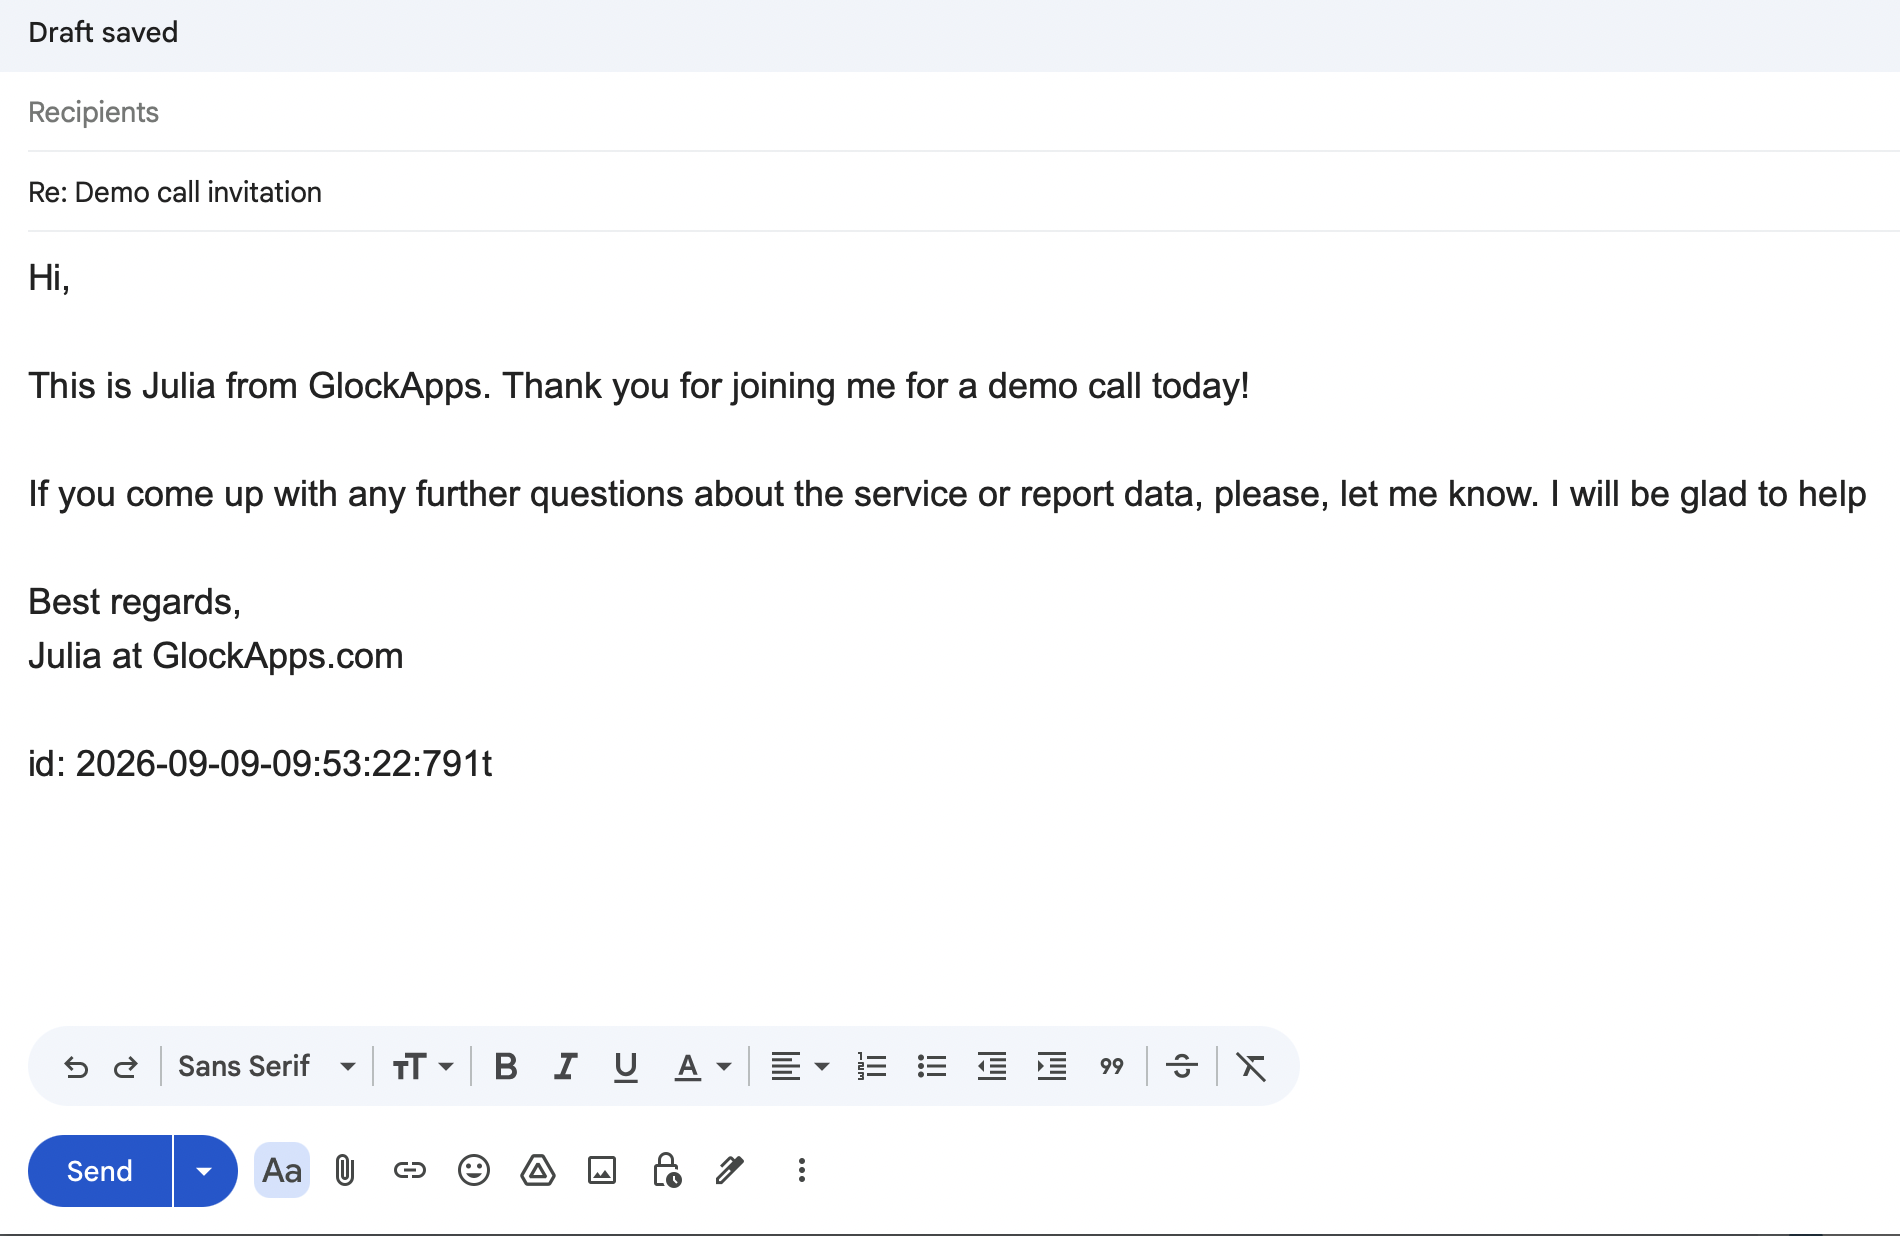
Copy the provided id string, open the message in your email service provider and paste the id in any place in the message Subject line or body.
Next, copy or download the seed list.
The full seed list contains 100+ email addresses. You can download it as one file or several files with 25 email addresses in each.
To get the seed list as one file, choose “In one list” item from the menu.
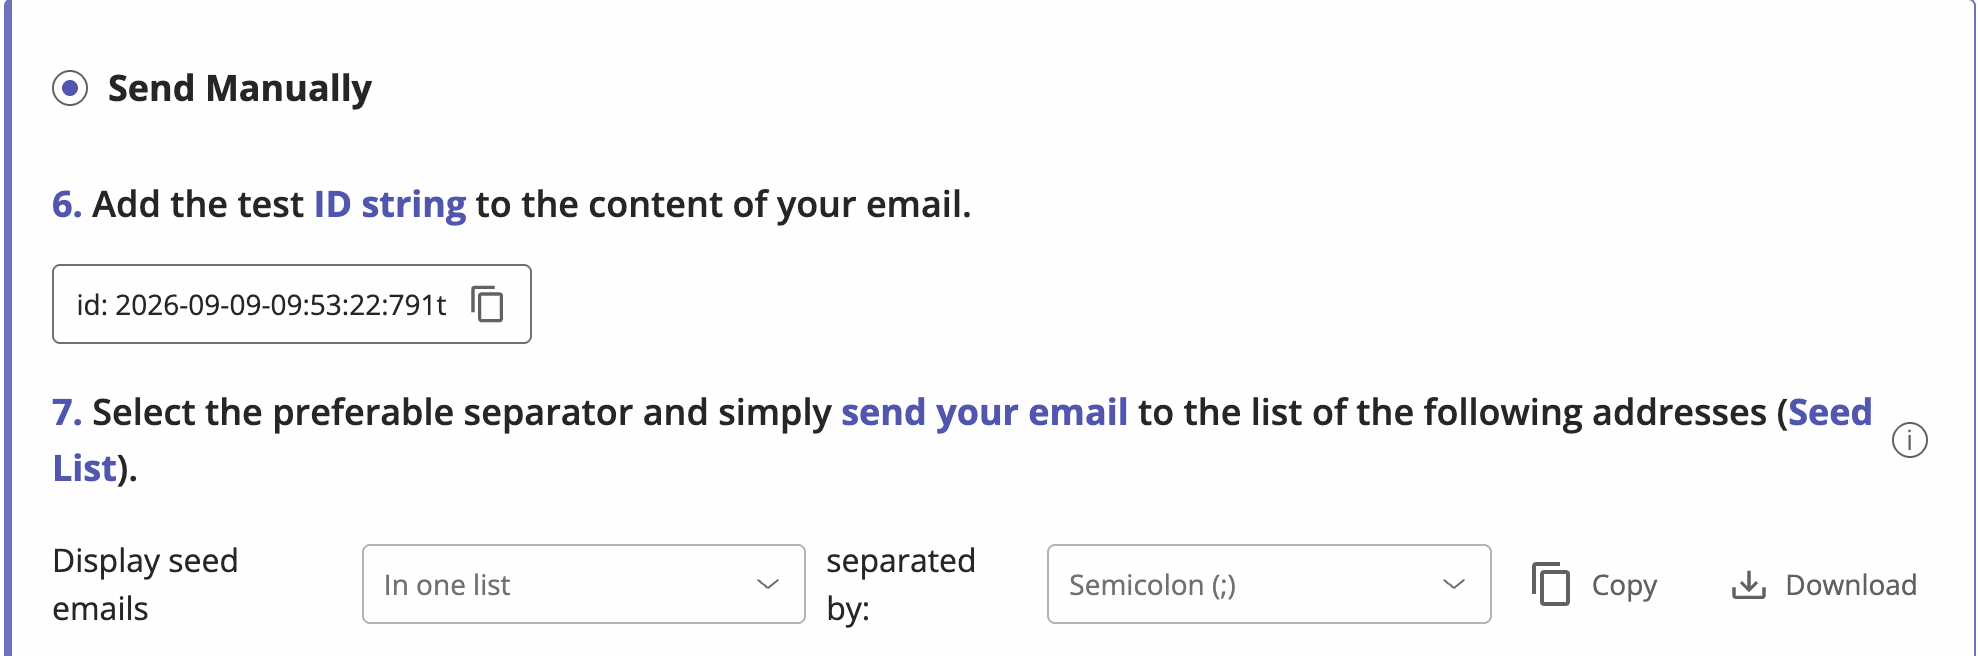
To get a split seed list as several files, choose “Grouped by 25” item from the menu.
It is recommended to use a split seed list if you send the messages by putting many email addresses in the email’s To: field. To avoid reputation and deliverability issues in this scenario, you should use no more than 25 addresses in the email’s To: field at a time.
Now you have to send the message containing the id string to the seed list(s).
Best practices to send the message to the seed list:
– create a new list or group in your email service provider, import the seed list in that group and send the message with the id string to the test list;
– if you put the seed email addresses in the To: field, add up to 25 emails in the To: field and send the message with the same id to each part separately;
– in order to get the most accurate results, send your test email the exact same way you would email your recipients. It’s important to reproduce the same conditions (ESP, email software, email account, email content, etc.).
When the message is sent, return to GlockApps and click “View Report”.
Be patient as the results may appear with a delay if your email service provider doesn’t send the messages quickly.
How to Understand Deliverability Report
The results start showing almost immediately. In some cases, there may be a delay with showing the report because email service providers may take some time to deliver the messages.
Your email message will undergo several checks during the deliverability test. When the test is finished, the testing results are presented in three tabs: Deliverability, Content Analysis, and Action Steps.
Deliverability
Under the Deliverability tab, you can see these reports:
Email Placement Results
Inbox rate – the percentage of the messages delivered in the Inbox of the seed email addresses;
Tabs rate – the percentage of the messages delivered in the tabs other than the Primary Inbox, for example the Gmail’s Promotions tab;
Spam rate – the percentage of the messages delivered in the Spam folder of the seed email addresses;
Missing rate – the percentage of the messages, which were not delivered to the seed email addresses (they could have been blocked by the ISP or have not been sent by your email service provider).
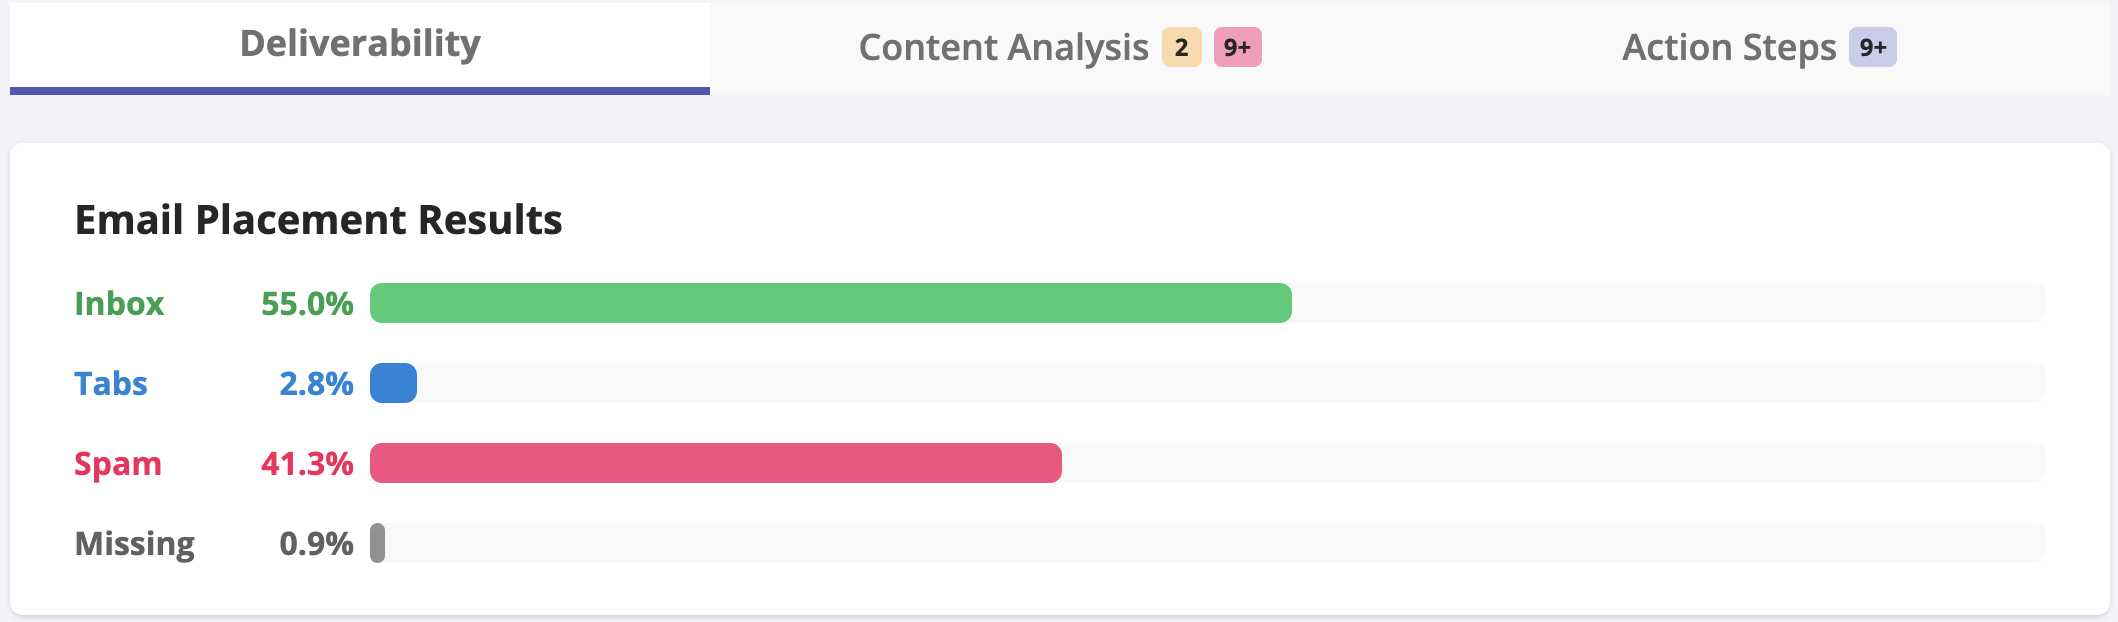
GlockApps Inbox Insight Test: Email Placement Rates
IP Analytics
The IP Reputation reports provides the information about the IP address(es) used to send the message to the seed list:
IP Address – the IP address used. If the ESP uses a shared IP pool, you will have a list of IP addresses in this report.
rDNS – the host name associated with the appropriate IP address resolved during the rDNS check.
Blocklists – the number of public IP blacklists where the appropriate IP address was found.
Inbox + Tabs – the number of messages delivered from the appropriate IP address to the Inbox or a tab in the Inbox.
Spam – the number of messages delivered from the appropriate IP address to Spam.
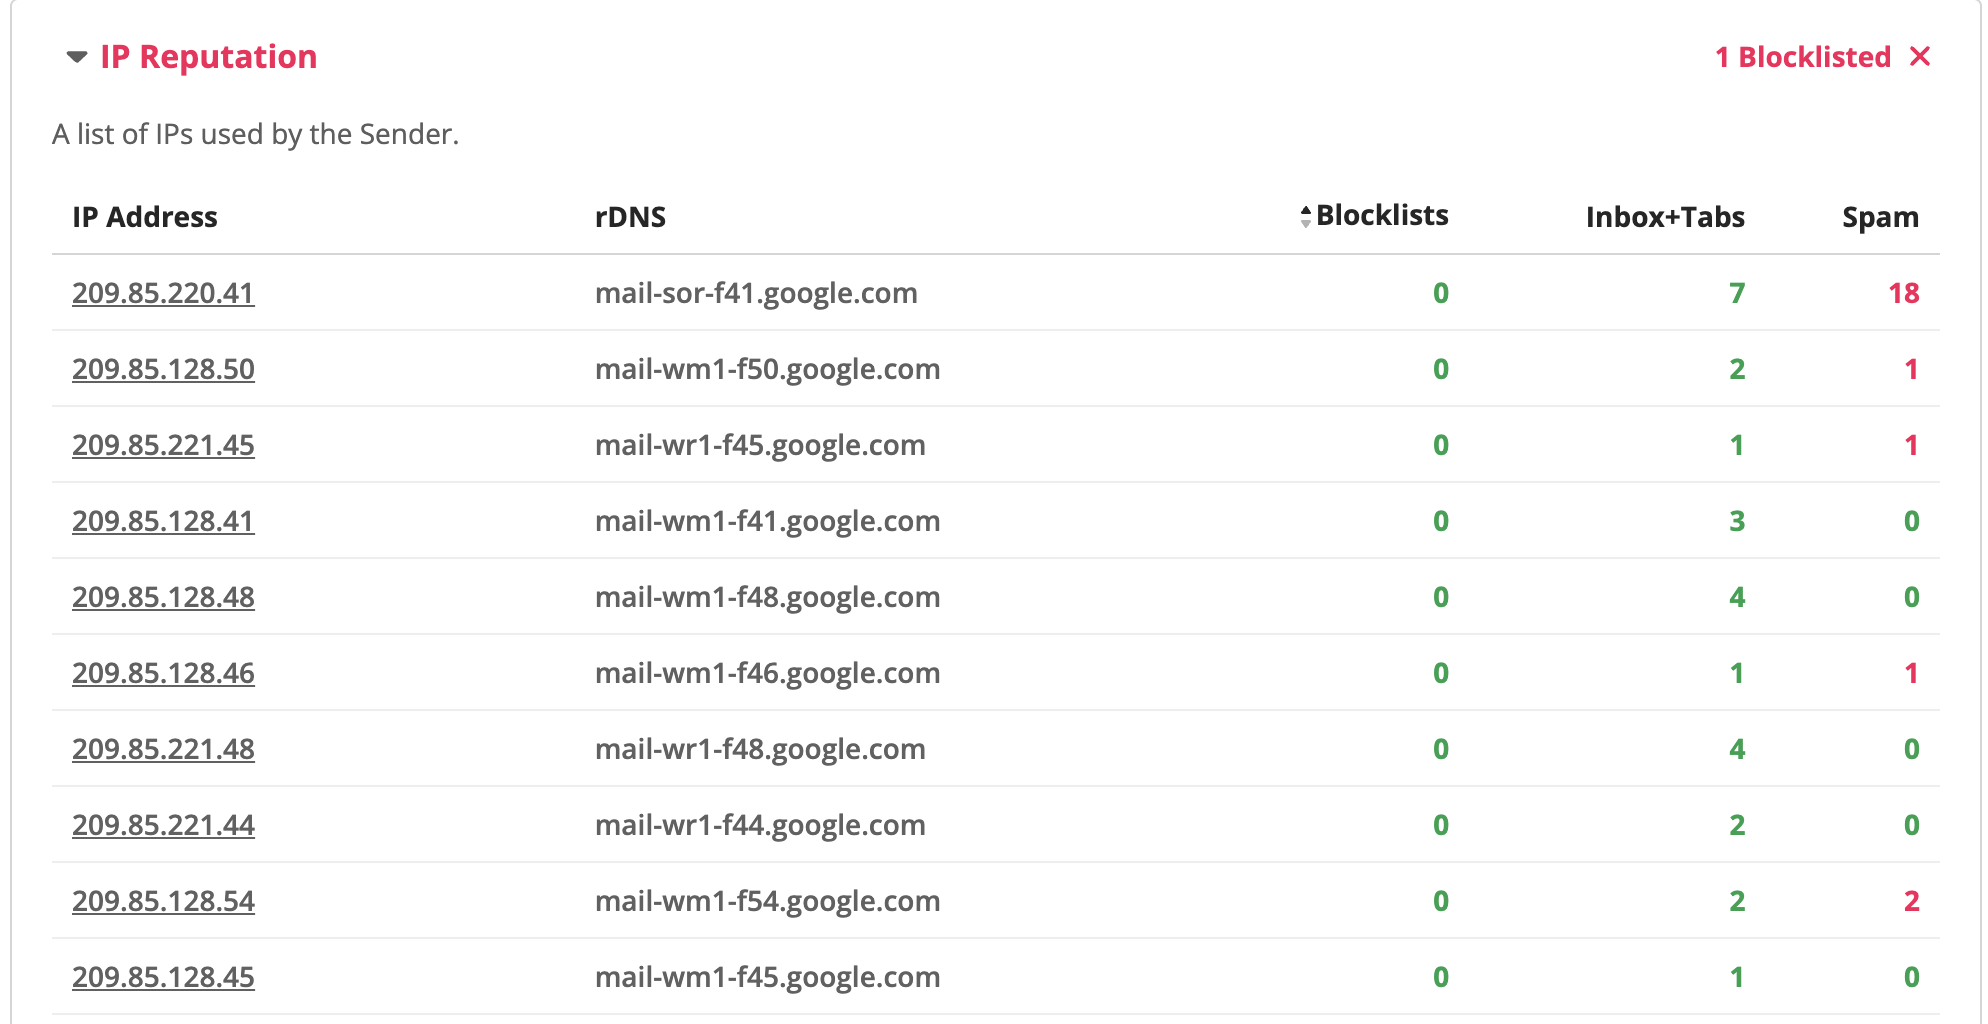
GlockApps Inbox Insight Test: IP Reputation report
rDNS – the test that resolves the IP address to a host name and back. It’s important to note that reverse DNS lookup, also known as reverse DNS resolution (rDNS), is a crucial step in ensuring that your emails are delivered successfully. In fact, some companies like AOL won’t accept messages from servers without rDNS. Keep in mind that each IP address can only be associated with one domain name.
HELO to IP – the test that resolves a host name to an IP address. According to email best practices HELO (or EHLO) string should be sent as a fully qualified domain name (FQDN).
Domain Analytics
The Domain Analytics report provides the information about the blacklisting status of the domain(s) used in the message and email authentication (DKIM and DMARC) results.
Domain Blocklists – the results of the domain check against the domain blacklists. Important! GlockApps checks the target domains used in URLs in the message content.
If the domain is listed, click the arrow to view the report. Use the “Go to Blacklist” button to open the blacklist website where you can do the domain lookup, read about the blacklisting cause, and find removal instructions.
DKIM – the result of the DKIM authentication test. DKIM, which stands for DomainKeys Identified Mail, is a technique that connects a domain name to an email message, allowing an individual, role, or organization to take responsibility for the message. This ensures that the message was properly signed and wasn’t altered in transmission.
DMARC – the results of the DMARC authentication test. DMARC stands for Domain-based Message Authentication, Reporting, and Conformance. This email authentication mechanism ensures that the message comes from a legitimate source and successfully passed authentication by SPF and DKIM.
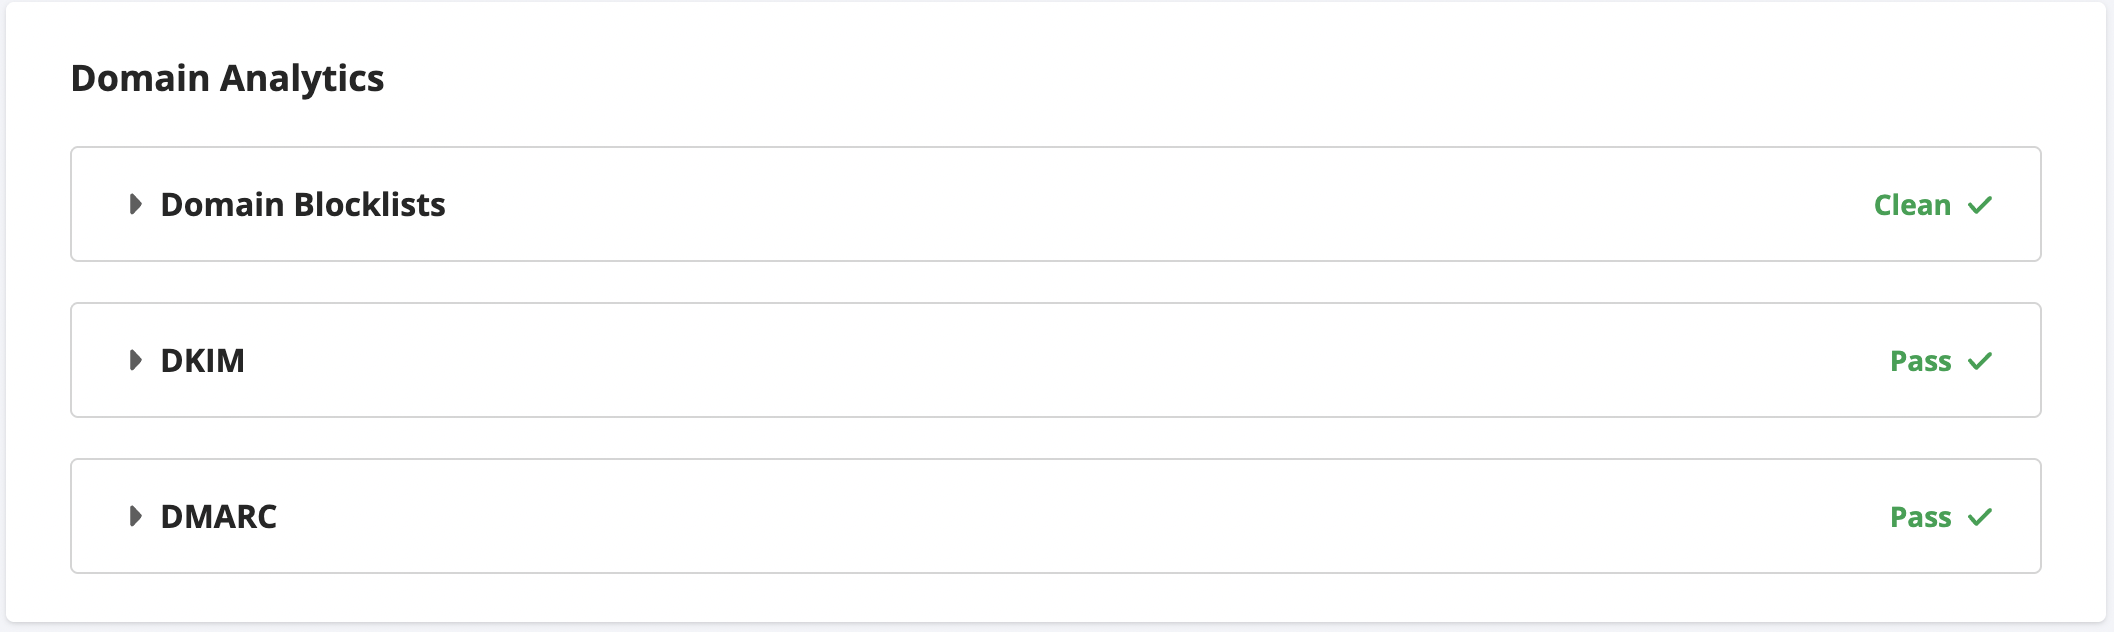
GlockApps Inbox Insight Test: Domain Analytics Report
Spam Filters
The results of running the email through the spam filters are presented in this area.
Google Spam Filter, Microsoft EOP and Proofpoint return the results such as Spam/Not Spam, Phishy/Not Phishy.
Barracuda and SpamAssassin give numeric scores. The lower, the better. Click the arrow next to the filter to see the details about what affected the email spam score.
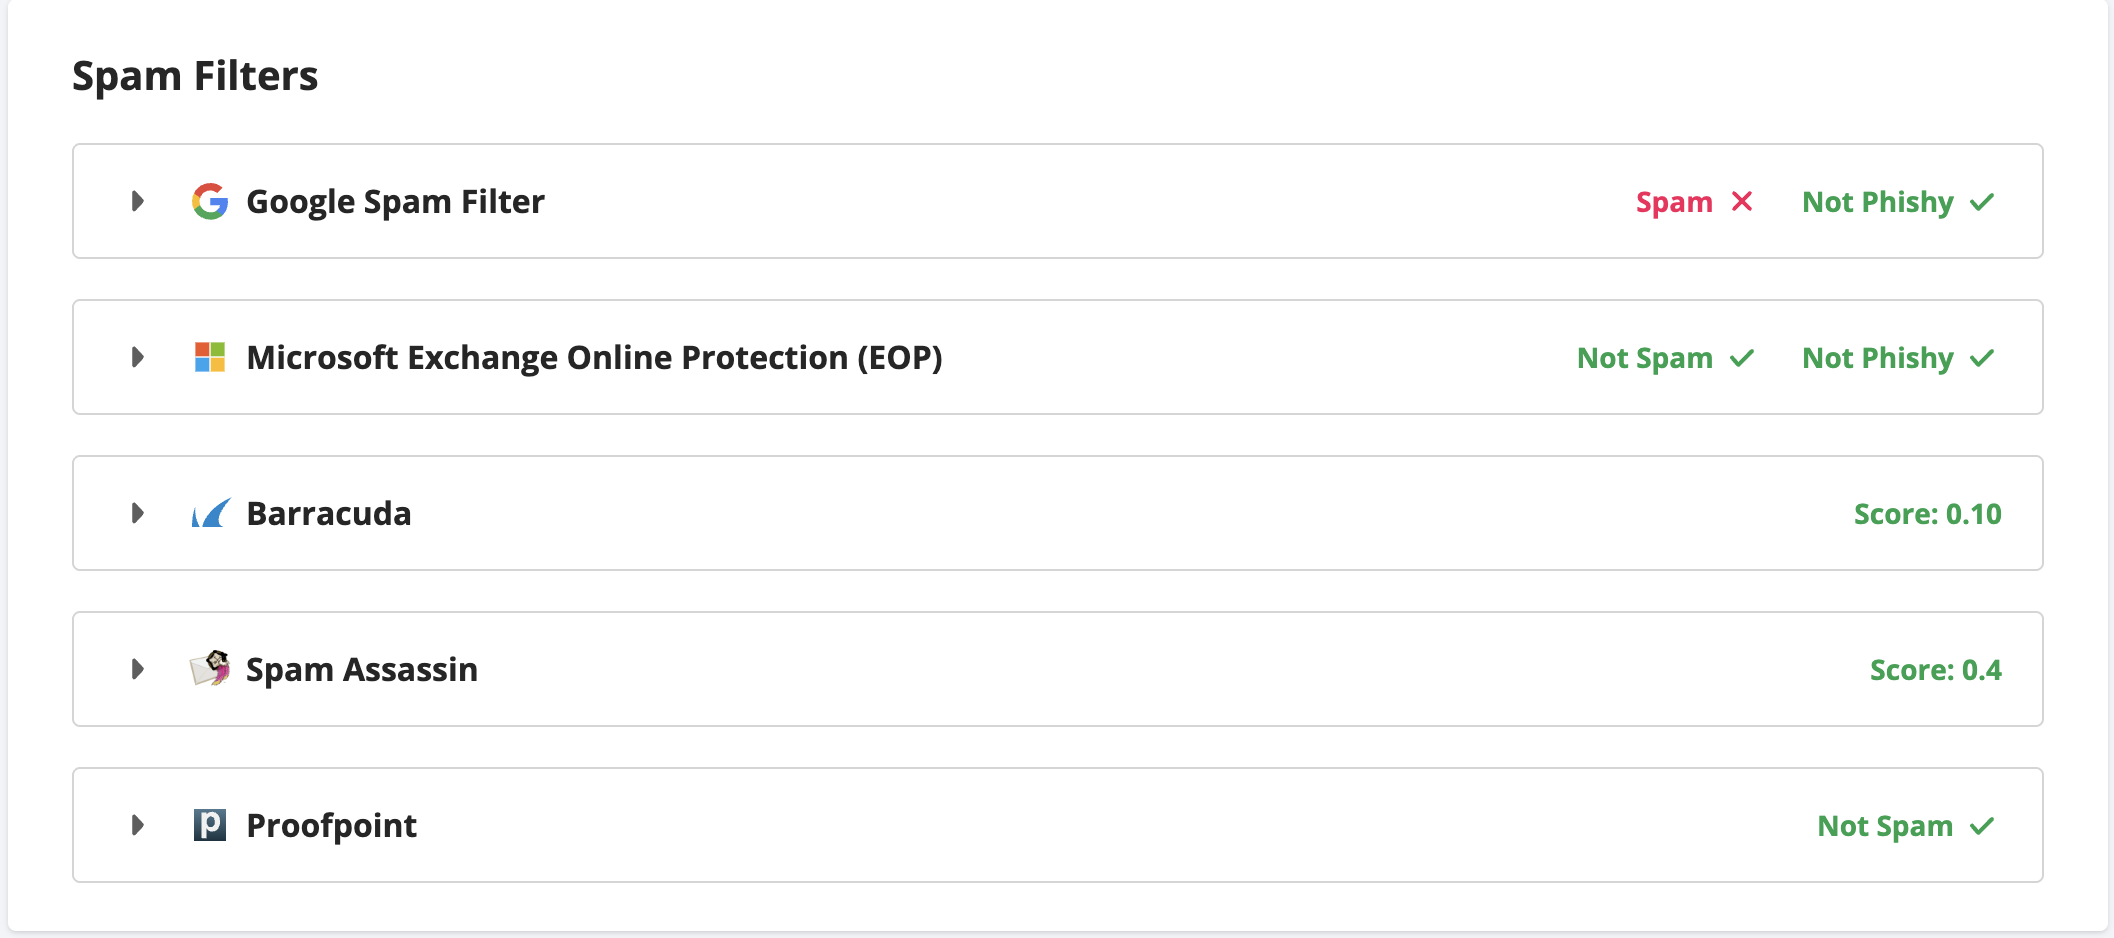
GlockApps Inbox Insight Test: Spam Filters Scores
Email Providers Delivery Report
The statistics for the email placement results are grouped by the location of the seed email addresses. In the collapsed view, you can see the general email placement rates for each provider group.
You can expand each area manually by clicking the arrow at the left side or use the Expand All button to get all the details on the screen. In the expanded view, you can see the email placements rates for each provider and for each seed email address individually.
The delivery report provides the following details:
Provider/email – the seed email address set up with the given ISP.
Delivered to – the email placement result. It can be Inbox, Spam, or a tab like Promotions or Newsletter if the ISP supports tabs in the Inbox. If the message wasn’t delivered to the seed email address, the result is Missing.
Sender IP – the IP address the message was sent to the appropriate email address from.
SPF – the result of the SPF authentication test. The SPF (Sender Policy Framework) protocol ensures that the message was sent from an authorized sender.
Blockists – the number of public IP blacklists where the appropriate IP address was found.
Delivered in – the delivery time that passed after the message was sent and before it reached the appropriate email address. The delivery time allows to determine email delivery throttling issues.
Clicking on the three vertical dots at the right side brings the menu with the Header and IP Details options.
Select Header to view the message headers. You may need the headers when troubleshooting email deliverability issues with an ISP.
Select IP Details to see the report of the IP blacklist check. When the message is sent from a shared IP pool, which is a typical scenario with the majority of email service providers, GlockApps checks each IP used to send the message to the seed list against blacklists. In the IP Details report, you can find the check results for the IP address, from which the message was sent to that particular seed email address.
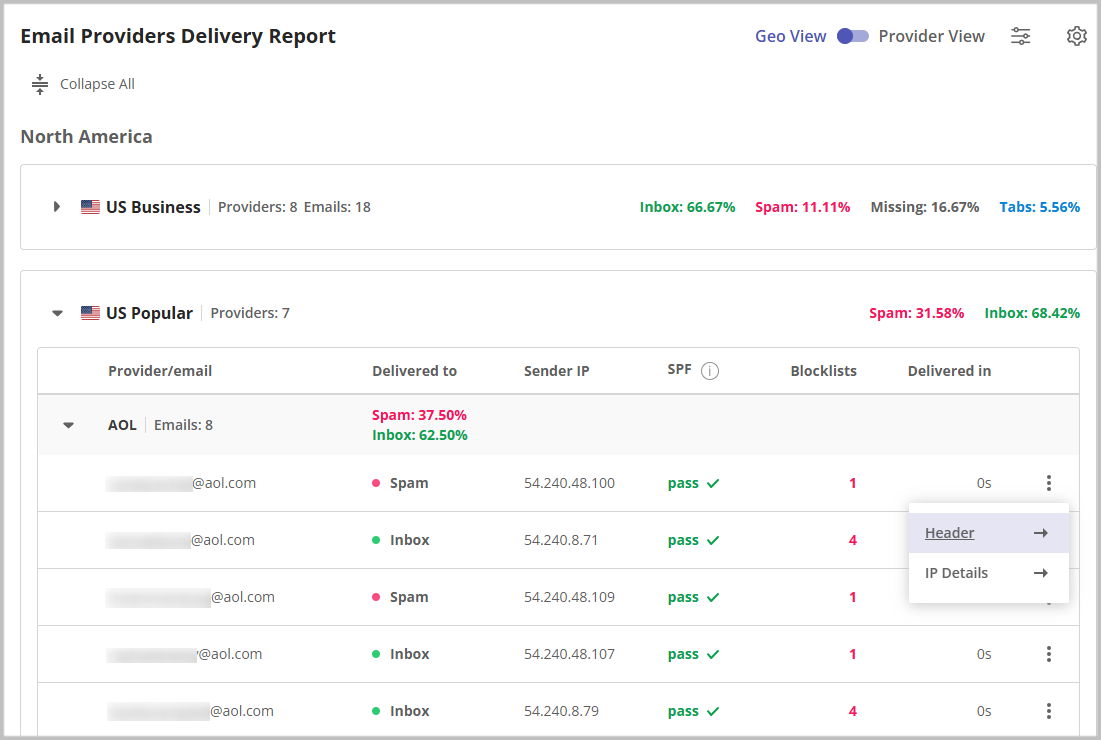
GlockApps Inbox Insight Test: Email Providers Delivery Report
The Email Providers Delivery Report has two views: Geo View and Provider View.
In the Geo View, the results are grouped by the geographical location of the supported ISP. In the Provider View, you can get the results grouped by the ISP such as AOL, Yahoo, Outlook, etc.
In the Filters, you can set up the filter to display the results that meet a condition of your choice.
In the Settings, you can show/hide the columns in the report.
Content Analysis
In Content Analysis, you can find the information about the message size, images, and URLs if they were used in the email.
Email Information
Here is the size of the plain text part, HTML part, and the total message size.
Total Message size includes email headers and embedded content. It’s typically bigger than the raw size due to MIME overhead and base64 encoding of binary attachments (causing files to be about 137% larger).
Images size – the size of all the external images linked to the message, not counting embedded images.
Image count – the number of all the images (embedded and linked) used in the content.
Link count – the number of URLs used in the content.
Images
The following information about the images is displayed:
Preview – shows the image used in the email.
Status – shows whether or not the image was loaded correctly.
URL – URL used to insert the image in the email.
Redirects – the number of redirects for the image URL.
Alt – alternate text for the image if it’s available in HTML.
Size – image size.
Response time – the image URL response time.
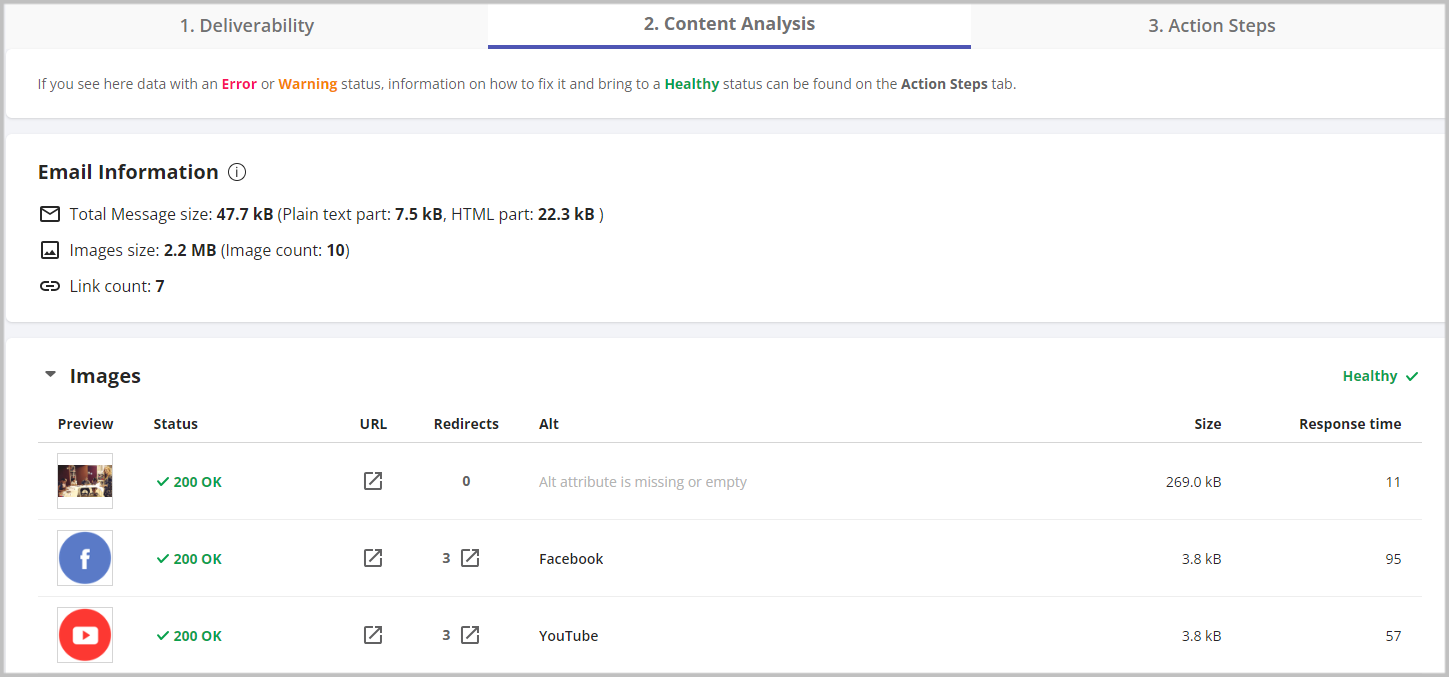
GlockApps Inbox Insight Test: Content Analysis Report
Links
The following information about the URLs is displayed:
Anchor Text – anchor text of the URL if it’s available.
Status – shows whether or not the URL opened correctly.
URL – URL used in the email.
Redirects – the number of redirects for the URL.
Size – size of the web page the URL leads to.
Response time – the web page response time.
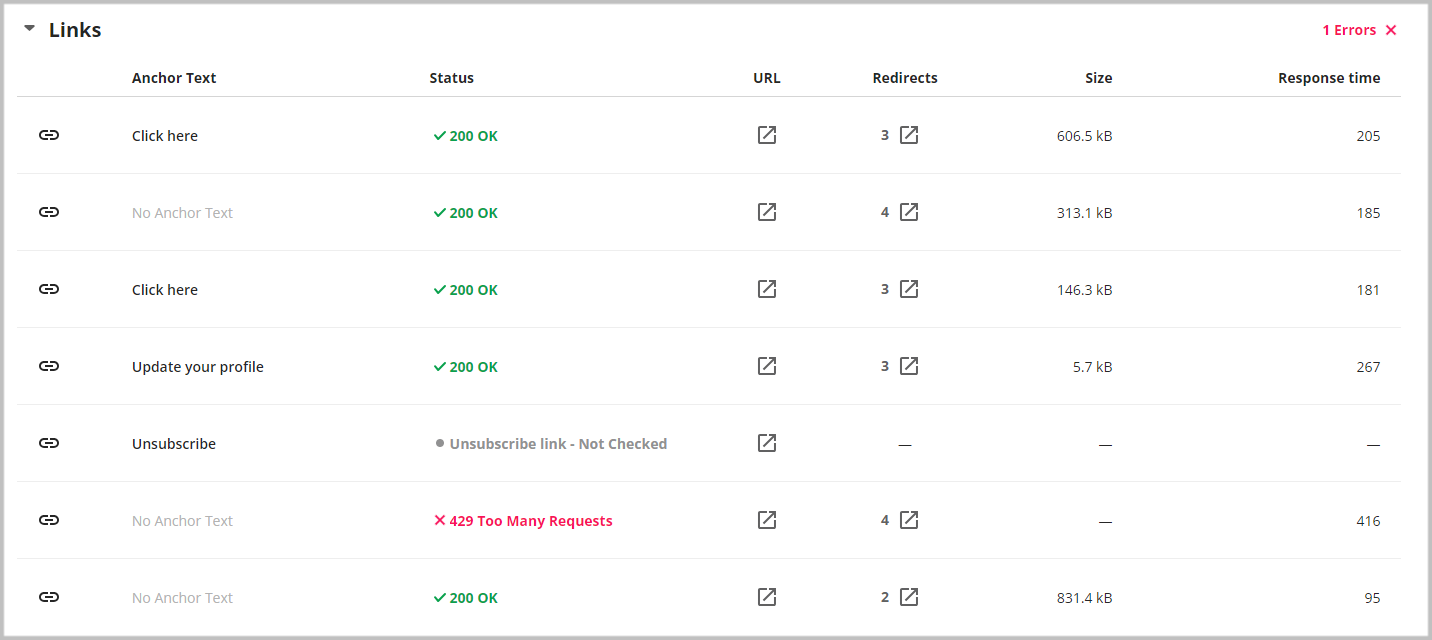
GlockApps Inbox Insight Test: URLs Report
HTML
The HTML checker calculates the overall support for your email for different platforms to give you an idea of the general compatibility of your HTML email.
The test creates a list of warnings with the details about the clients with full support, partial support, and no support of the appropriate HTML element, and the specific notes.
The GlockApps HTML checker calculates the compatibility percentage for these platforms:
- Android: 1&1, AOL, Gmail, LaPoste.net, Orange, Outlook, ProtonMail, SFR, Samsung Email, WEB.DE, Yahoo! Mail;
- Desktop Webmail: 1&1, AOL, Fastmail, Free.fr, GMX, Gmail, HEY, LaPoste.net, Mail.ru, Orange, ProtonMail, RainLoop, SFR, T-online.de, WEB.DE, WP.pl, Yahoo! Mail;
- iOS: AOL, Apple Mail, GMX, Gmail, LaPoste.net, Orange, Outlook, ProtonMail, SFR, WEB.DE, Yahoo! Mail;
- macOS: Apple Mail, Mozilla Thunderbird, Outlook;
- Mobile Webmail: Gmail;
- Outlook.com: Outlook;
- Windows: Mozilla Thunderbird, Outlook;
- Windows Mail: Outlook
You can see the percentages for all available platforms at a time or choose one or several platforms.
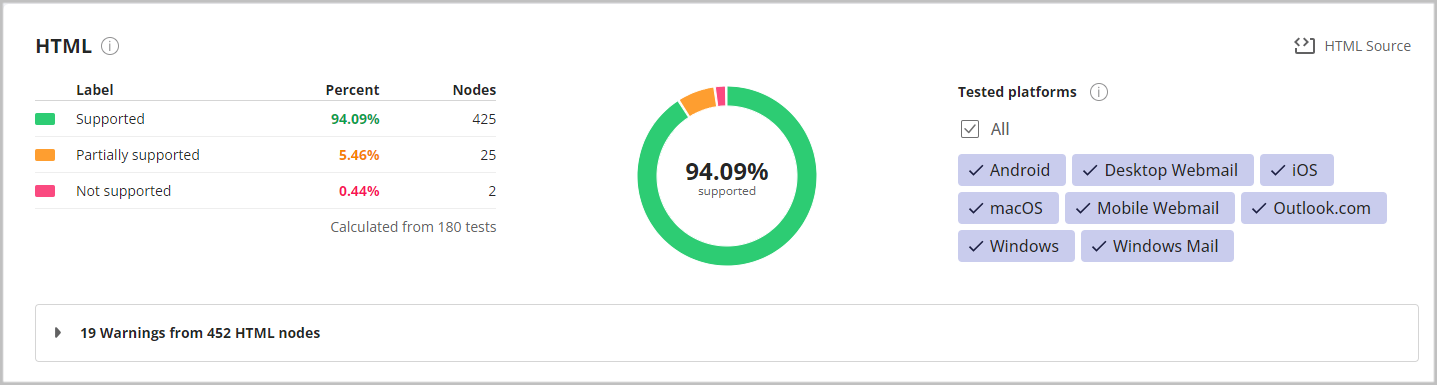
GlockApps Inbox Insight Test: HTML Check report
The meanings of the statuses are:
– Supported: the percentage and the quantity of the HTML nodes supported by all the selected platforms.
– Partially supported: the percentage and the quantity of the HTML nodes partially supported by the selected platforms. A partial support means that an email client will render the HTML code properly if it meets a condition, for example: Outlook Windows (2019) will render the display:none CSS node only if it’s not applied directly to the <img> element.
– Not supported: the percentage and the quantity of the HTML nodes not supported by the selected platforms.
By clicking the “HTML Source” button, you can access the email preview, HTML code, and RAW message.
HTML Nodes and Warnings
If the HTML checker finds partially supported and not supported HTML elements in the email source, it creates a list of warnings. The warnings are sorted by the HTML node name in the alphabetical order.
Near the node name, there is the node type, e.g. CSS or image. The number like x25, x34, x16 etc. means how many times this element is met in the email’s HTML code.
The colored line shows the respective support level for the appropriate HTML element where
green – supported
yellow – partially supported
red – not supported
Put the mouse over the line to see the support percentages.
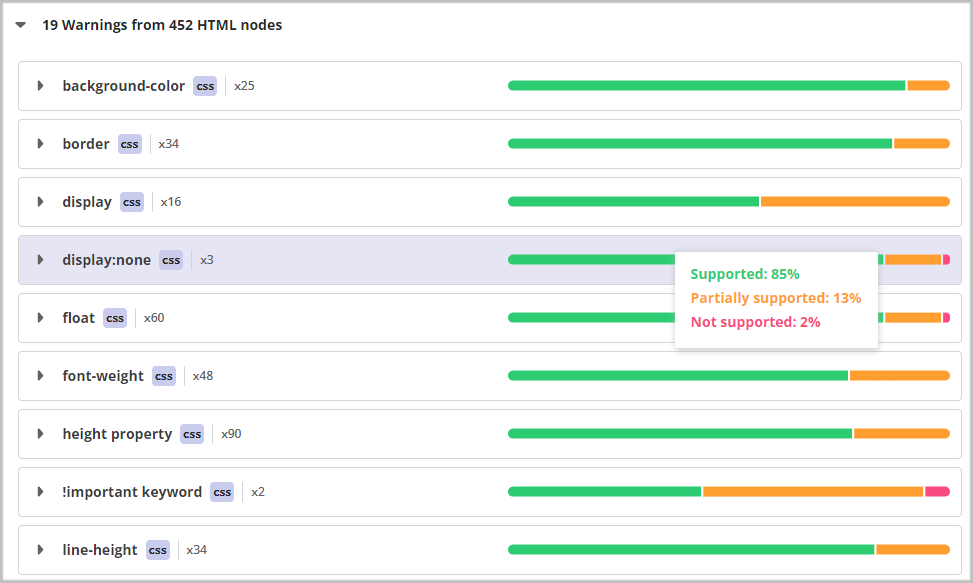
GlockApps Inbox Insight Test: HTML Check report
Each warning includes the details about the clients with full support, partial support, and no support of the appropriate HTML element, and the specific notes about a partial support.
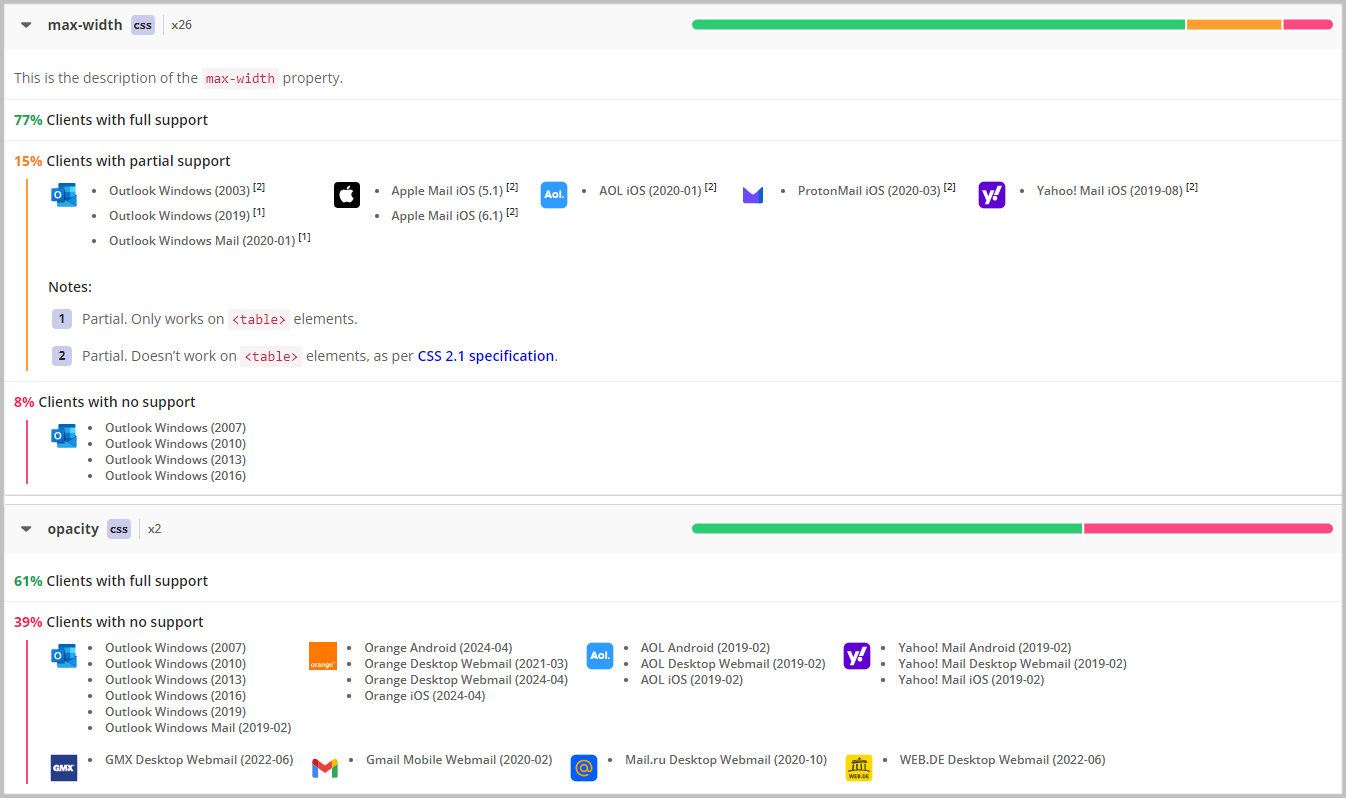
GlockApps Inbox Insight Test: HTML Check report
It is up to you to decide what you do with the received information and how the detected warnings may impact your email deliverability.
Action Steps
If the email testing results show placements in Spam folder, GlockApps creates a list of action steps where it showcases content-related and email configuration-related issues and provide “how to fix” recommendations. It is recommended to take the suggested steps to improve your email deliverability.
For more details, refer to this article: How to Improve Deliverability: Action Steps Explained.
Menu Bar
At the top of the report, there are three options with additional functions: Email Preview, Seed List, Share, and Export PDF.
Email Preview
Here you can get the message in three formats: Preview, HTML Source, and RAW Message. You can download the RAW Message including headers as a TXT file.
Seed List
Click to get the test ID string and the seed list. You may need to get the ID and seed list again if you want to re-send the same message to the seed list after noticing undelivered results in the report.
Share
Click to get the URL of the shareable report. You can open the shareable report in the browser or copy the URL and share it with anyone who doesn’t have access to the GlockApps account.
Export PDF
You can choose the tabs to export to a PDF file: Deliverability, Content Analysis, and action Steps.
How to Fix “Waiting for Data”
There are two main reasons why you may not receive a deliverability report after clicking the “View Report” button.
- You forgot to add the ID string to your email. In this case, GlockApps cannot associate the email with the test.
- Your email system or email service provider did not send the message to the GlockApps seed list.
In both scenarios, a failed test displays an empty report that says “Waiting for data…”
Troubleshooting Tips:
1. Delete the failed test.
Put the check mark near the test and click Delete. The credit used for the test automatically returns to the balance.
2. Re-use the failed test.
Click on the “Waiting for data…” title, click Seed List at the top, copy the ID string, and paste it in the message.
Resend the message to the seed list using your SMTP server or email service provider. No credit is taken out of the balance if you use the same test again.

Read more:
How to Test Email via Single Email Address
Useful Resources: How to Troubleshoot Email Deliverability
- Why are my Emails Blocked by Gmail?
- How to Increase Email Inbox Rate
- Email Best Practices: Email Deliverability Audit
Related Posts
Sending an email does not automatically mean it will reach the recipient’s inbox. Your message may land in spam, get Read more
Sending an email looks almost effortless. You write a message, click Send, and a few seconds later it appears in Read more

When people look for tips on improving email marketing, they often see advice geared toward improving subject lines, copy, or Read more
Finding the best time to send an email campaign sounds simple. Search online, and you will quickly find recommendations such Read more