IP Blacklist Check – Is My IP Blacklisted? – IP Blacklist Lookup

The word ‘Blacklist’ makes the email marketer’s hair curl. But you know what they say: his bark is worse than his bite. After reading this article, you will understand how blacklists work, how to check IP blacklists, and what to do if your IP is on the list.
What is an IP Blacklist?
A blacklist is a real-time database of IP addresses or domains that have been known to send spam or malicious content. Many Internet Service Providers and mailbox providers consult the blacklist databases in order to filter emails sent to the users within their network.
The result of having the sending IP blacklisted can vary from being a small nuisance to a complete block of your email campaigns.
In order to have better email deliverability, email marketers should have an understanding of why an IP or domain can get on a blacklist, how to run an IP blacklist check, what to do if the IP is blacklisted, and how to avoid this in the future.
How Do Blacklists Work?
Internet organizations, such as Mail Abuse Prevention Systems, monitor all IP addresses and domains that actively send emails and create databases of IP addresses and domains that are known in some way to be used to send spam. ISPs can use these databases when filtering emails from a sender. This is an important step to protect mailbox users from spam.
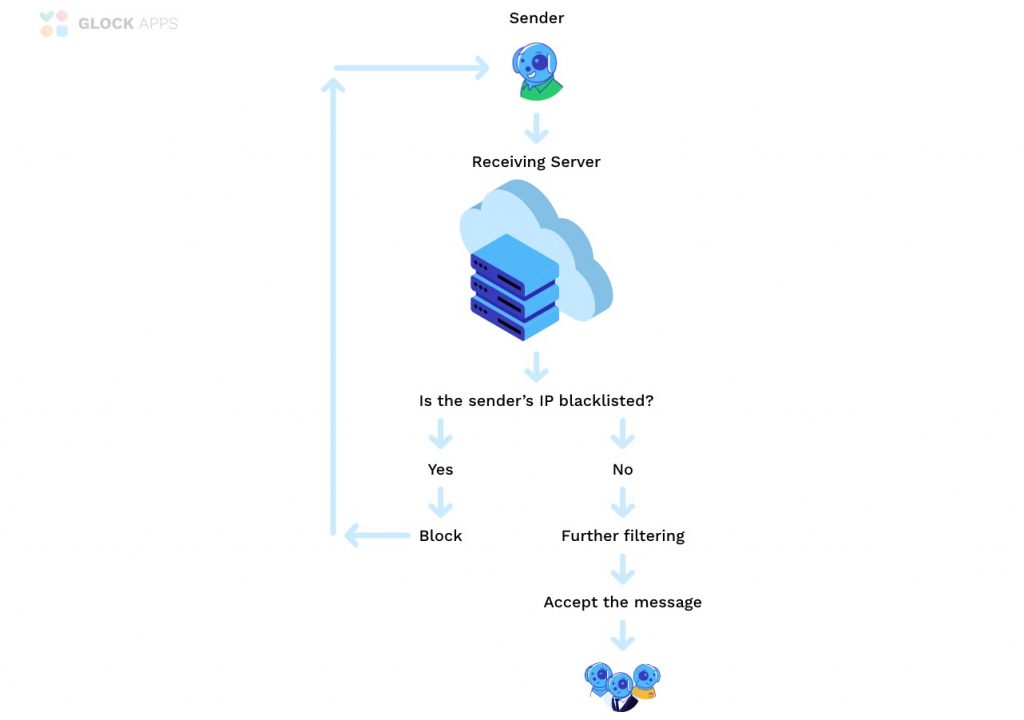
When you send an email, your sending IP address, which is the IP address of the SMTP server you use, is logged. It allows the receiving mail servers to determine who is sending the email and check if that sender is known to send good or bad emails by referencing the blacklists’ databases.
Here is the process:
- Suppose you send an email from marketing@domain.com to John Smith.
- John’s mail server determines your sender’s IP address (for example, 10.10.10.10) and resolves it into a domain name.
- John’s mail server runs a domain and IP blacklist check against a database of IPs/domains on a blacklist.
- If the IP address or the domain is blacklisted, your email will most likely land in John’s spam/junk mail folder, without the message content being scanned.
- If the IP or domain is marked as a repetitive spam sender, the ISP’s spam filters will reject your message, meaning it won’t even reach John’s spam folder.
Why is My IP Address Blacklisted?
Open relay servers, hosts on certain websites, email spamming software, etc. are often added to blacklists. Some blacklists add IP addresses and domains based on user reports of unsolicited emails, e.g. spam complaint rate.
Spam complaints happen for very different reasons:
- a recipient didn’t subscribe to the email list;
- a recipient didn’t find the unsubscribe link;
- a recipient forgot they opted in to the list;
- a recipient receives too many emails;
- content is not relevant to the recipient’s expectations.
So the next time you ask “Why is my IP address blacklisted?”, first check your complaint rate. Note that a small complaint rate (<0,01%) is acceptable. But if the number of complaints is higher than the allowed threshold, mailbox providers may start filtering the emails to spam folders or blocking the emails entirely.
Poor email list hygiene can also lead to IP blacklisting issues. Sending messages to old or inactive email addresses that could have been turned into spam traps, or harvesting email addresses that are potential spam traps is destructive to your sender reputation.
Spam traps fall into three categories:
- Recycled spam traps. These are email addresses that were valid email accounts but have not been engaged with any messages for a long time. Email messages sent to these addresses are typically returned by the receiving server for a year or more before the recycled email accounts are reactivated as spam trap addresses.
- Pristine spam traps. These are email addresses that are set up by anti-spam organizations and ISPs with the only purpose to determine spammers. They have never been used to sign up to an email list. Pristine traps most commonly get on mailing lists when senders purchase, rent, or harvest addresses.
- Typos. One of the common ways to detect a spam message is to catch it in an email address with a typo. For example, @hotail instead of @hotmail, @gmal instead of @gmail, etc.
What You Need to Know about Spam Traps
Read this 12-page whitepaper to learn about deliverability issues caused by spam traps
and what to do if you are already blocked.
Read also: Spam Traps 101: from Nightmare to Opportunity
How to Check If IP is Blacklisted?
Checking if your dedicated IP address is blacklisted is simple:
1. Check the IP listing on a Blacklist’s Site.
You can visit the sites of the most popular blacklists such as Spamhaus, SURBL, SORBS, Invaluement, and SpamCop and manually look for your IP or domain listing there.
If the IP is listed in the database, you can also read why it was listed to know what you will have to address to avoid the listing in the future.

2. Use an IP Blacklist Tester.
To save time, you can run an IP blacklist check with the GlockApps IP blacklists monitoring tool or a Gappie bot. You will be able to add your sender’s IP address and have it scanned against more than 70 largest blacklists automatically on a regular basis. This way, you will find out about blacklisting before it becomes a problem. You will see where your IP is listed and receive direct links to the blacklists’ websites to find more information about your IP listing and the de-listing process.

GlockApps IP Monitor: Check Your IP against Blacklists
Gappie is a free 24/7 bot for Telegram and Slack that can run IP blacklist checks as often as you need it with unlimited checks per day. He will send you notifications if your IP/domain is blacklisted so you could start the delisting process right away.
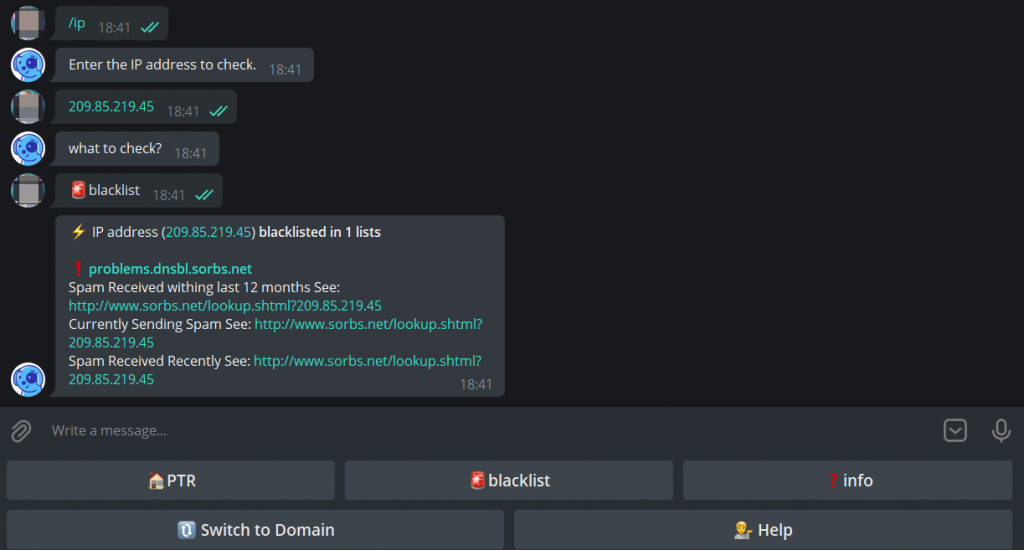
Gappie for Slack and Telegram: Check Your IP against Blacklists
3. Analyze Your Bounce Emails.
If your deliverability is impacted by the blacklisted IP or domain, you will most likely receive a bounce email notification. The bounce error description will tell that your email was rejected because of an IP or domain listed on a blacklist.
In most cases, the bounce message includes the name or URL of the blacklist. An example of this type of message is
“Message rejected due to IP [0.0.0.0] listed on RBL [X]”
How Do I De-List My IP or Domain from a Blacklist?
First, you need to run an IP blacklist check to find out which blacklists your IP or domain is on. Different blacklists have a different impact on email deliverability. Being listed on large blacklists (Spamhaus, SORBS, SURBL) will most likely lead to a spam folder placement or an entire email block while listings on small local blacklists can have zero impact.
If you don’t receive bounce emails because your sending IP or domain is blacklisted and the GlockApps deliverability report shows a high inbox rate, then blacklists are not likely to influence your sender reputation. In the opposite case, blacklisting issues should be addressed.
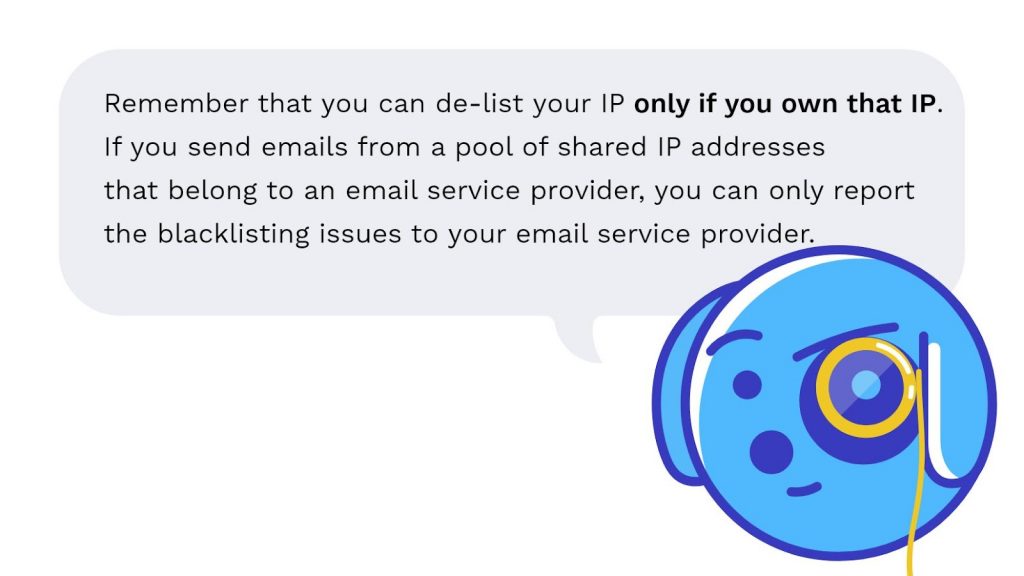
At DNSBL sites, you can enter your numeric address to check if IP is blacklisted, and then follow the instructions on how to be removed. Some blacklists have a manual de-listing process, some will do it automatically after some time.
The key here is to be proactive. Identify and fix the issues that got you to a blacklist (check your email acquisition sources, remove inactive users, verify the message content) before you contact the blacklist’s owner. They like to see that you’re taking it seriously and trying to solve your delivery challenges in a timely fashion.
Keep in mind these things when applying for a delisting:
- If you are a repetitive abuser, you will find it difficult, if not impossible, to be de-listed.
- Don’t dispute or argue. Focus on the facts they provide you and apply the remedies.
- If you know the cause of a listing, fix it first and then apply for de-listing.
Read more: How to Remove IP Address from Blacklist
How Not to Get Blacklisted?
Even legitimate email senders can end up with IP blacklisted due to their email sending habits. However, by using the best email marketing practices, you will greatly reduce your risk of being blacklisted.
Here are the simple rules to follow:
- Don’t purchase or scrape email addresses. Instead, build your email list organically to make sure you are not hitting spam traps.
- Don’t send to email lists rented from 3rd party organizations even if you have a similar offer. Those people didn’t subscribe to your emails and are likely to report your email as spam.
- Use a confirmed opt-in process. You may end up with a smaller list but you win in quality. The confirmed opt-in process protects you from bots, malicious subscriptions, invalid email addresses caused by human typos, and spam traps.
- Remove inactive email addresses regularly. If a recipient has not engaged with your emails for the last 90 days, exclude their email address from your mailing list to avoid sending to a recycled spam trap.
- Monitor user complaints. Subscribe to feedback loops where it’s possible to receive email notifications when someone reports your email as spam. Remove complaining users from your list in a timely manner.
- Add an unsubscribe link to a prominent place. Make sure that the unsubscribe process is working and the recipient will not receive any further emails from you.
- Send content that is relevant to the recipient. If you have different mail streams (how-to’s course, newsletters, promotions, product-related campaigns, etc.) and allow users to choose the mailing lists to subscribe to, don’t send all emails to all recipients. Respect their choice.
- Don’t send too much or too little. Find the best frequency in order to not overload the recipients and to not let them forget you. The best thing is to send as many emails as you promised on the subscription form.
You should remember that blacklists are not made to make the life of email marketers a nightmare. They are made to protect email recipients and help them receive the messages they desire. If you are doing everything to send relevant emails to confirmed subscribers, it will reduce the risk of getting your IP blacklisted to a minimum and will make the process of getting delisted much much easier.
Why Test Emails Before Sending Them Out?
Spam filters are constantly evolving and learning. There is no measure that will guarantee you deliverability for a lifetime. This means you should always test your email spam score, IP address, and email placement before you send an email campaign.
Inbox Email Tester is a tool that pinpoints elements of your letter that filters of different providers might see as spam.
Moreover, you should run a spam test when you observe an unusual drop in your email open rate. It may be caused by a high number of your emails going to the recipients’ junk folders or blocked messages. And GlockApps is a good place to start testing and optimizing your email deliverability.
