Sending accounts are used to create automatic tests and email tests via proxy email addresses. You can use the SMTP settings of most popular mailbox providers such as Gmail, Google Workspace, Outlook, and Office 365 and the SMTP settings of email service providers and delivery services that allow to use their SMTP servers in third party applications.
Below are the steps to create a sending account with the Outlook SMTP settings:
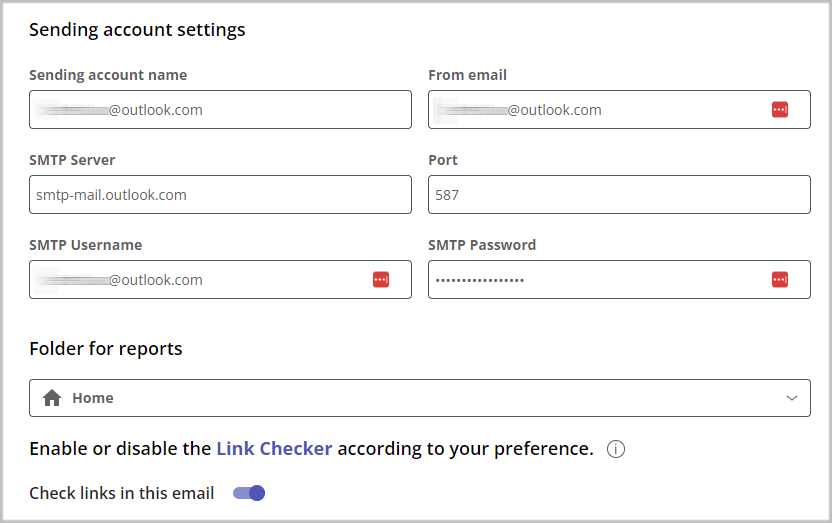
In your account, go to Inbox Insight -> Sending Accounts.
Click Create Sending Account and enter the information:
Sending account name: any name that you want to appear in the From field if your emails
From email: your email address set up with Outlook.com
SMTP server: smtp-mail.outlook.com
Port: 587
Security protocol: none (works as STARTTLS)
SMTP username: your email address set up with @outlook.com, @hotmail.com, @live.com
SMTP password: the App password created in your email account set up with Outlook.com.
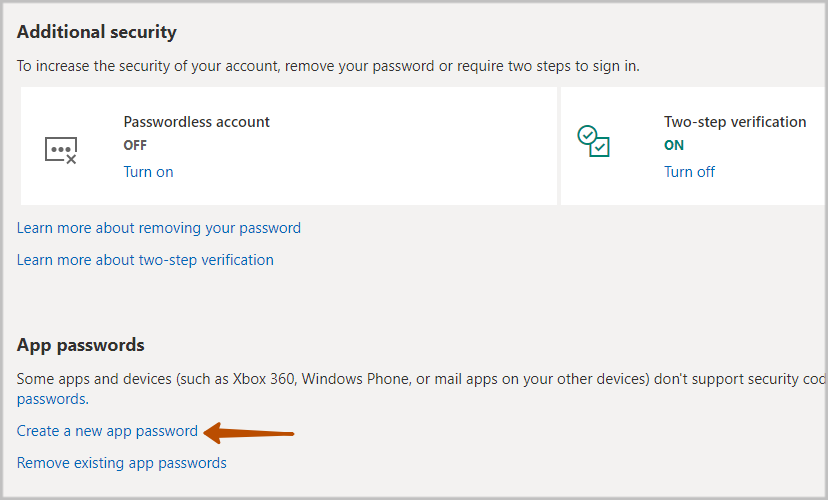
Important: To create an App password, you need Two-Step Verification on your Outlook.com account to be turned On.
Sign-in to your My Microsoft Account homepage.
Go to Security and click Advanced Security Options.
In Additional Security, click to turn the two-step verification to On if it’s Off.
Follow the steps to enable the two-step verification.
When you are asked to set up the Microsoft Authenticator, click Cancel to go to the next step.
After a few screens, you’ll return to the one where you first enabled 2FA, and there you can choose Create a new app password.
Copy the generated App Password and then click Done.
Paste the App password in the SMTP Password field in the sending account settings.
You may want to save this App password to a safe place in order you can use it again in the future. If you lose your App password, you can always create a new one following the above steps.
Choose a folder to create tests made via this sending account in.
Select the spam filters and email providers to be used for the tests made via this sending account.
Click Check & Create.
Common Errors and Troubleshooting Tips
If the SMTP settings you entered are not correct or something is blocking the connection to the SMTP server, you may see an error after saving the sending account settings. Check the list of the the most common errors and troubleshooting tips below:
Invalid smtp settings:tls: first record does not look like a TLS handshakeIf the SMTP server requires STARTTLS, make sure to select the “none” security protocol. It works as STARTTLS in GlockApps.
Invalid smtp settings:535 5.7.139 Authentication unsuccessful, user is locked by your organization's security defaults policy.Disable security defaults in your Outlook account:
Sign in to the Microsoft Entra admin center as at least a Security Administrator.
Browse to Identity > Overview > Properties.
Select “Manage security defaults”.
Set Security defaults to “Disabled”.
Select “Save”.
You can read more about security defaults here.
Invalid smtp settings:535 5.7.139 Authentication unsuccessful, SmtpClientAuthentication is disabled for the Mailbox.Enable the SMTP AUTH for that specific mailbox in the Microsoft 365 admin center:
Login to the Microsoft 365 admin center.
Go to Users > Active users.
Select the user, and in the flyout that appears, select Mail.
In the Email apps section, select “Manage email apps”.
Verify the Authenticated SMTP setting: checked = enabled.
When you’re finished, select “Save changes”.
Read also: What’s Causing the 550 SMTP Error and How to Fix It?